Commander Leopold McClintock tours Beechey Island in 1854 and creates the first photographic record of the Canadian Arctic

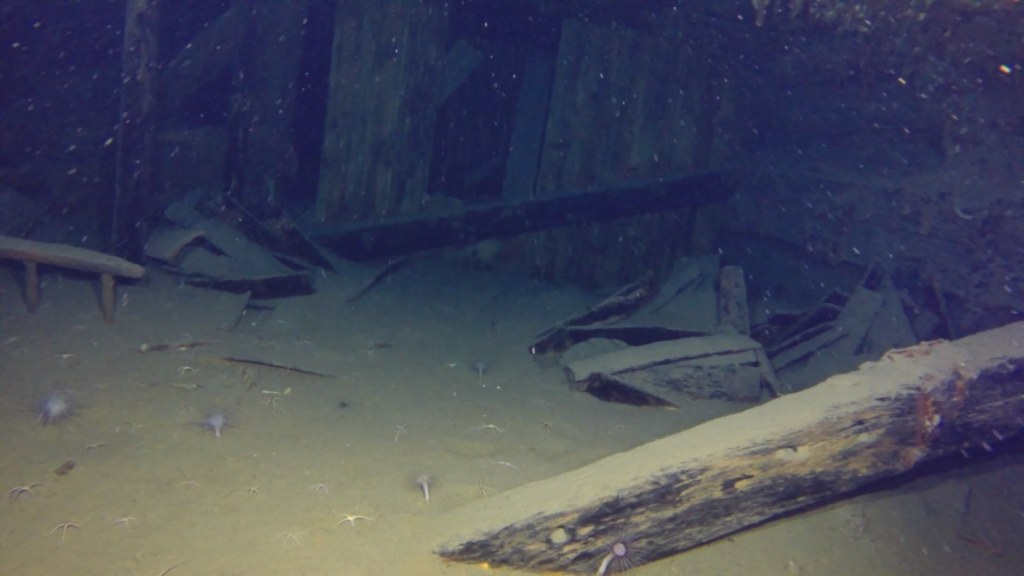
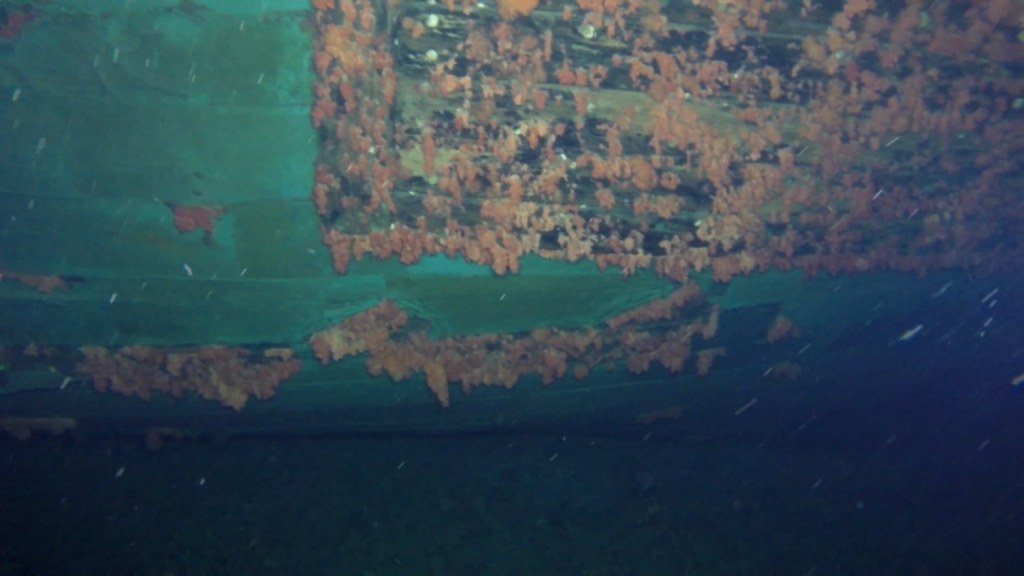
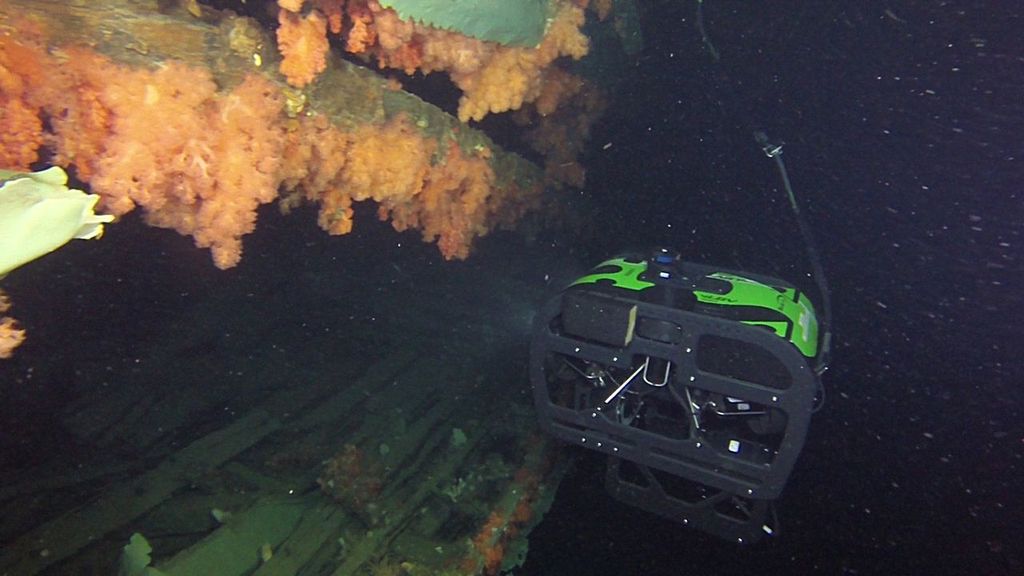
Beechey Island, Nunavut, (Iluvialuit) is an important site connected to both the Sir John Franklin Expedition (1845) and the period of searching for the lost crews of HMS Erebus and Terror. In August 1854 Commander F.L. McClintock captured the earliest known photographic depictions of the Canadian Arctic at Beechey. For anyone interested in this era of Arctic exploration, the ruins, cairns, memorials, and graves can become touchstones to the lost Franklin crewmembers and to the other sites of the ill-fated Expedition. In this post we will travel back in time to the critical moment in the creation of the built environment of the Beechey Island National Historic Site.1 We will also digitally reconstitute an incredible collection that has been dispersed across at least two continents. Join us as we accompany McClintock on his photographic expedition: A tour of Beechey in four amazing photographs!

HMS North Star at Beechey Island, August 1854 (Photograph # 1). The squat shape of Northumberland House and the high pyramid of tins and tent at right are notable. Courtesy of Douglas Wamsley

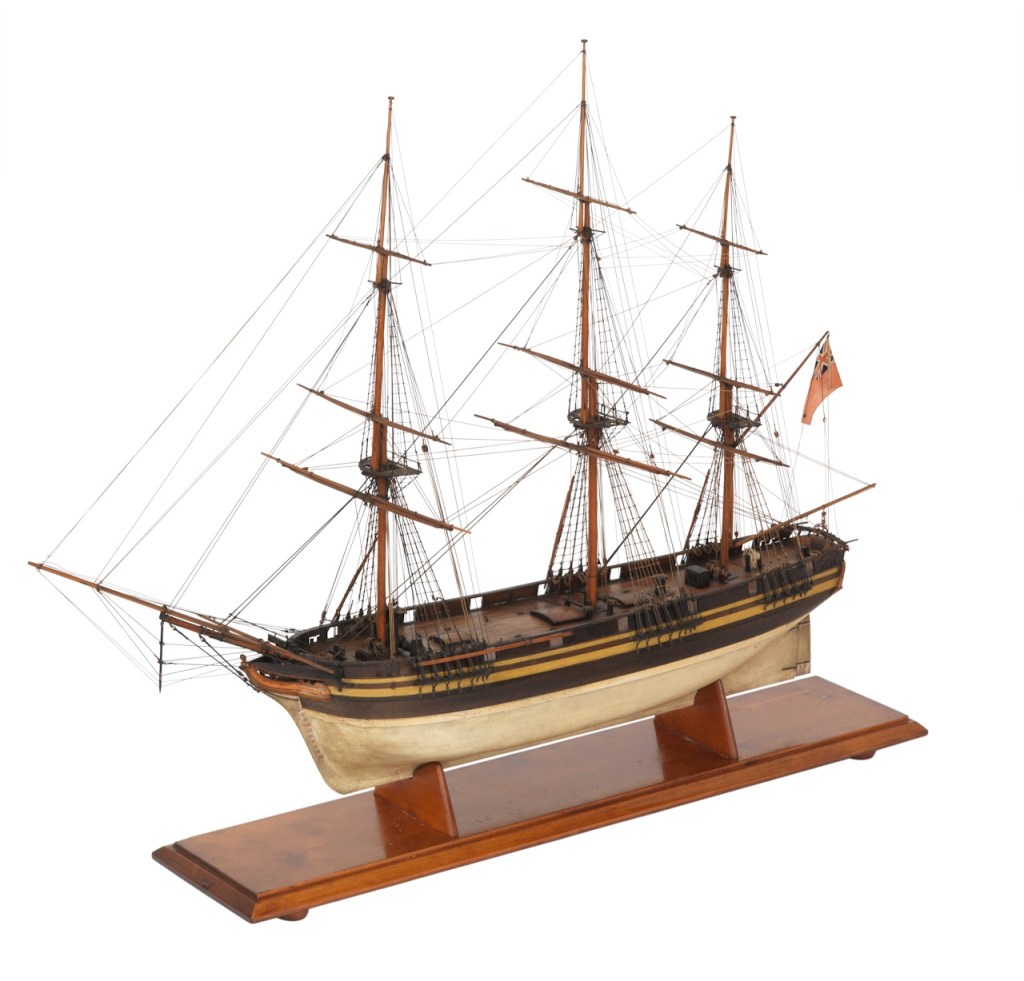
Arctic history scholar Douglas Wamsley holds in his personal collection two historically important photographs, the earliest depictions of Beechey Island Sites National Historic Site of Canada. These were taken in an era when the crews of five exploration ships – Sir Edward Belcher’s Expedition – were engaged in the most extensive official effort to find the missing crews of Sir John Franklin’s Expedition that would ever be mounted. In their 1996 Polar Record article “Early Photographers of the Arctic,” William Barr and Doug Wamsley identified the photographer of these two views as Royal Navy Commander F. Leopold McClintock (1819-1907).2 They connected the two photos to his journal entries, and dated the first photo as having been most likely taken on 12 August 1854. McClintock – a veritable “go anywhere do anything” phenom of Arctic exploration – had commanded HMS Intrepid.

The explorer behind the camera! Sir Francis Leopold McClintock, ca. 1860 [detail of] in a captain’s uniform wearing the Arctic Medal. From Cheyne / Pound engraving. Credit: Library and Archives Canada, Acc. No. 1939-150-1  (removed from 1860 Illustrated London News).

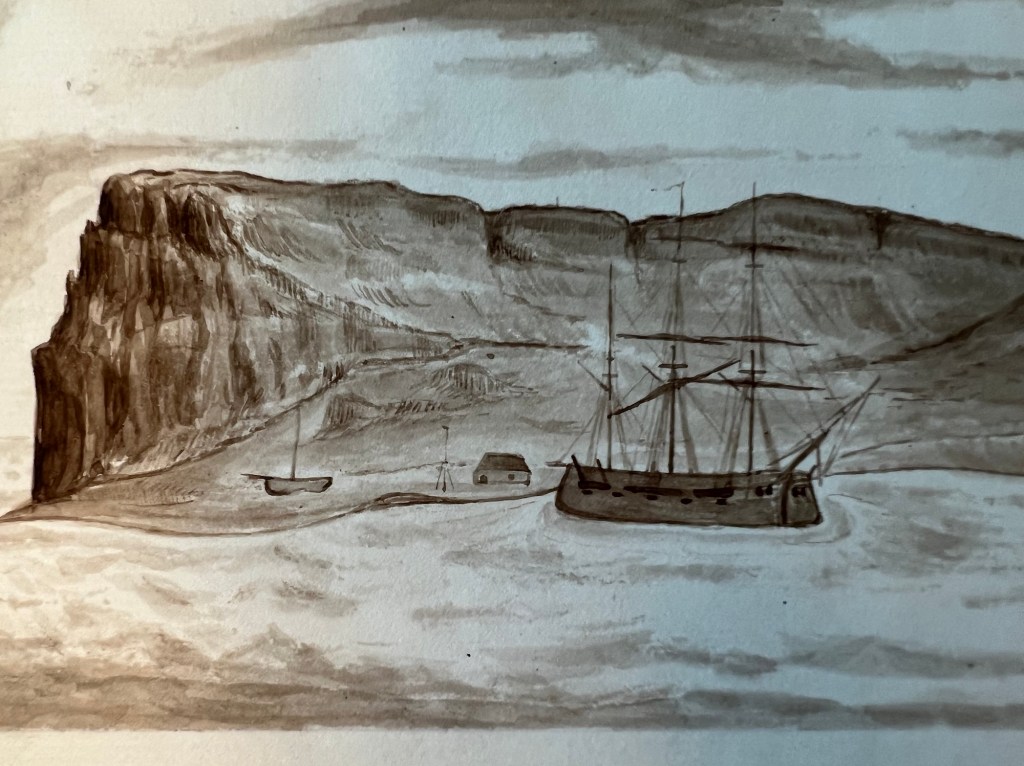
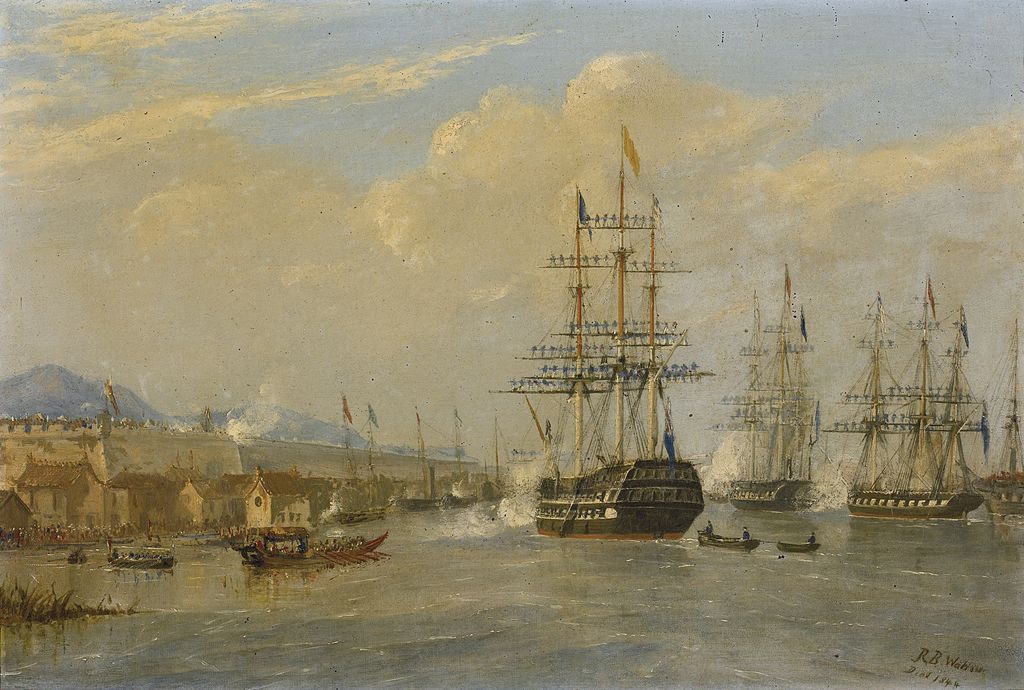
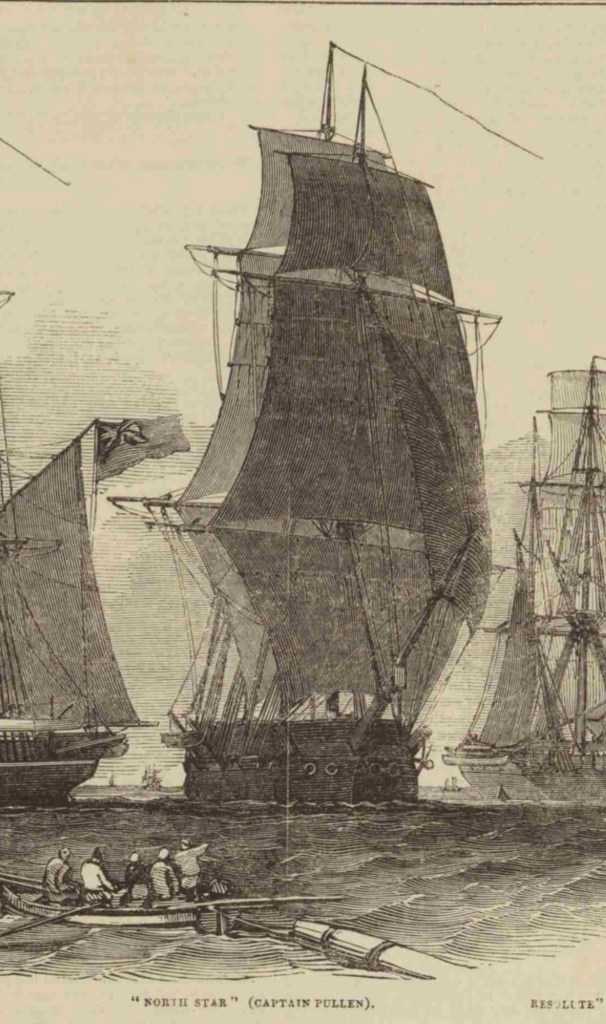
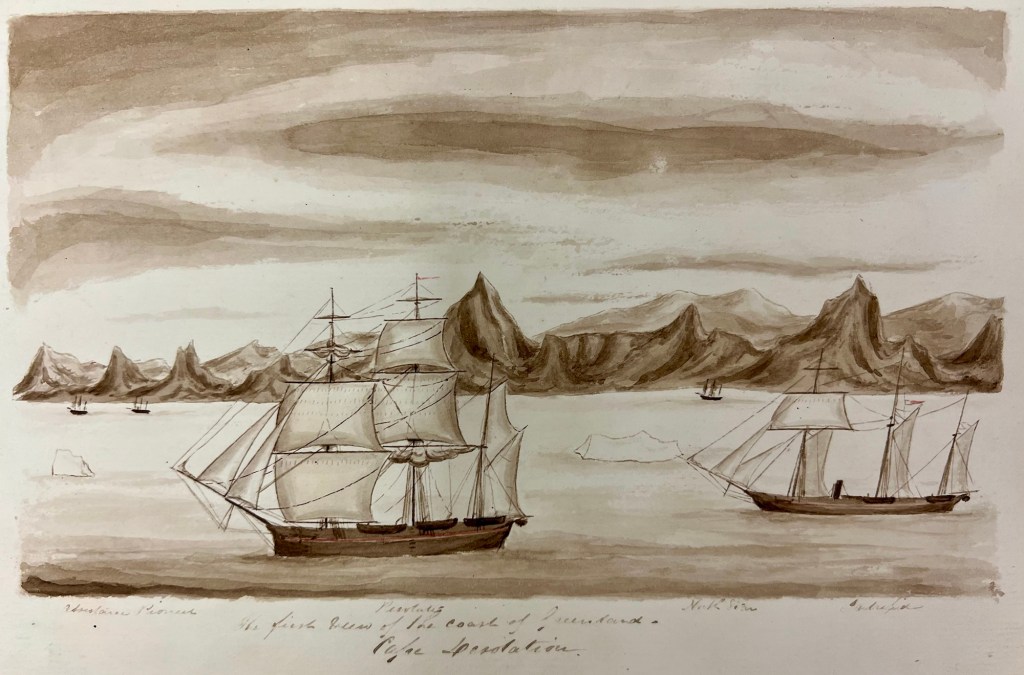
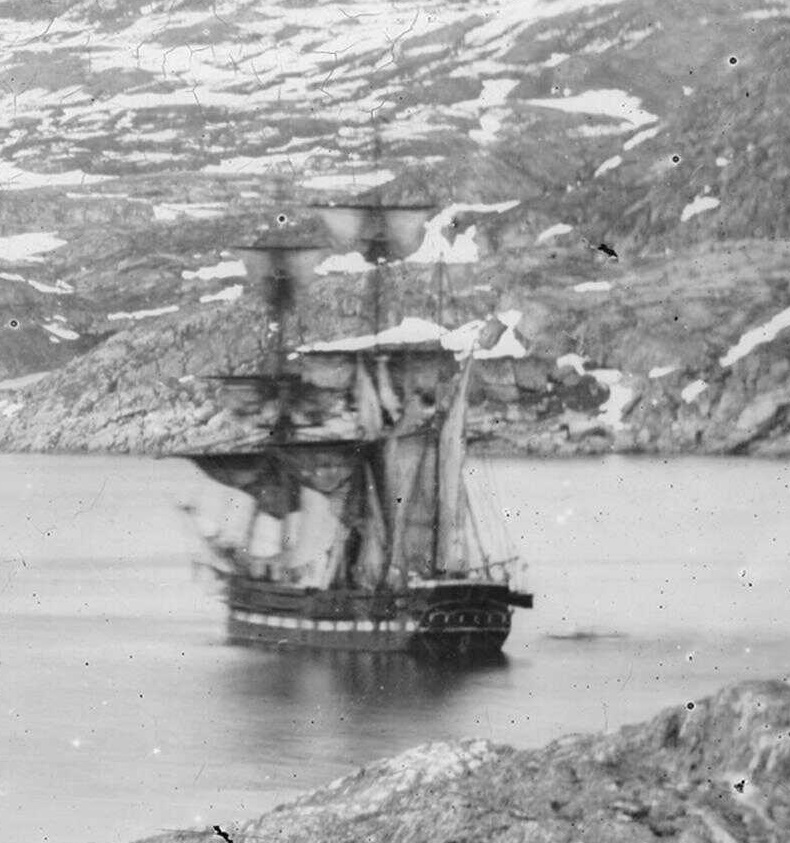
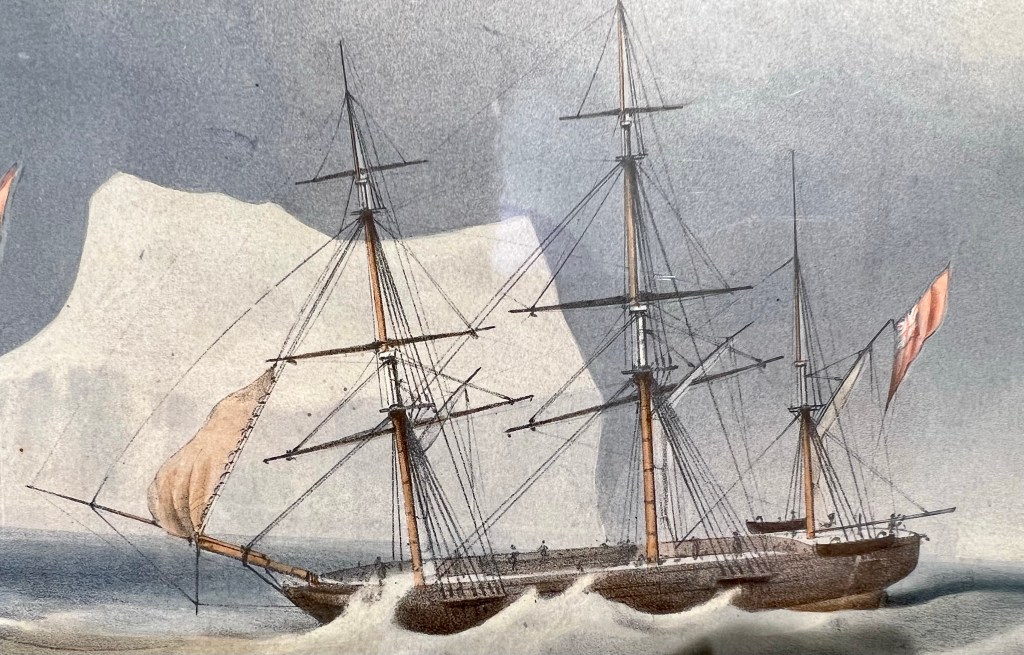
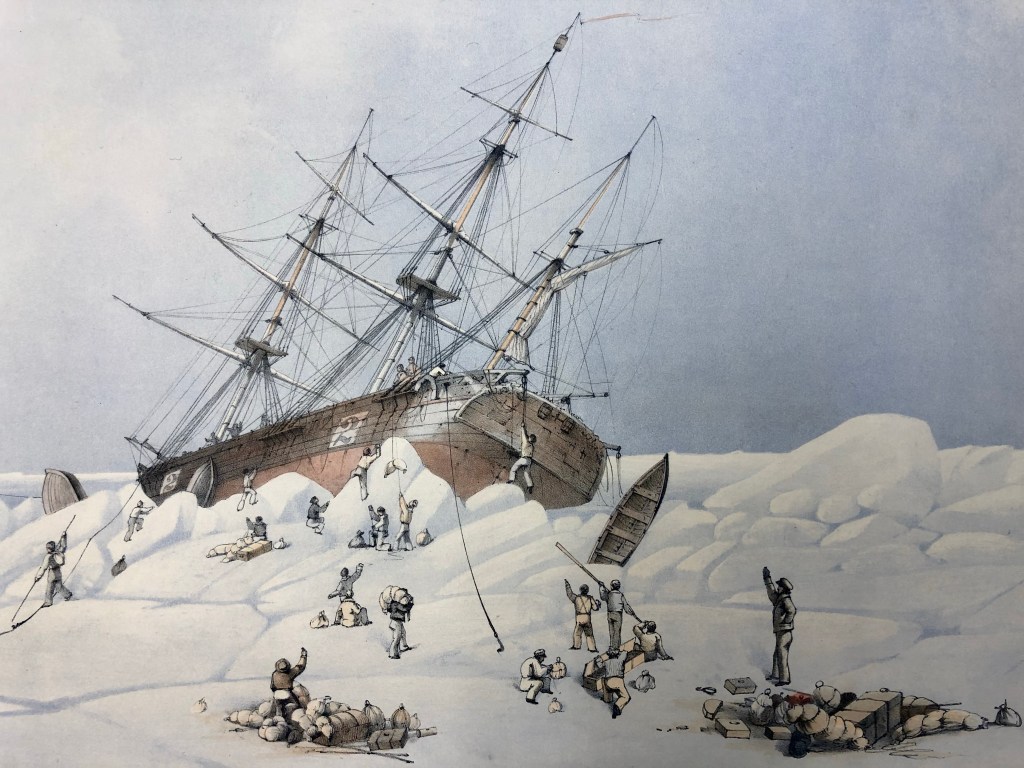
Accompanying HMS Resolute (Capt. Henry Kellett) as a steam tender on the western arm of the Belcher searches, both ships were beset in ice, with no guarantee crews could extricate them. The northern arm of the searches also being iced-in, Belcher ordered Kellett and McClintock to abandon their ships during May 1854 and return to Beechey. After sledging back eastwards over the still-frozen channels and straits, they were welcomed with cheers from the crew of HMS North Star, the Expedition’s depot ship, which was under the command of William John Samuel Pullen.3 Resolute’s Assistant Carpenter, William Mumford, worked up a view of the overall scene which they encountered on their arrival, 28 May 1854. This watercolour helps us contextualize McClintock’s subsequent photographic expeditions. North Star is shown locked in ice and pointed northeast into the Bay.4

HMS North Star, dated May 1854, by Assistant Carpenter William Mumford. This remarkable view from the end of May shows the beset vessel under Beechey’s imposing and bleak cliffs. Ashore, Northumberland House, the storehouse the Belcher crews built, and a large boat which is likely Sir John Ross’s rescue yacht Mary, are visible. This was drawn before the installation of the cenotaph. [Detail of] LAC 1986-18-27
“Arctic Sea. Barrow Strait. Erebus Bay” Beechey Island and surroundings as surveyed by WJS Pullen, including annotations of ship locations, depth soundings in fathoms, and extent of ice [cropped and modified with photograph location annotations relevant to this post] created in 1854 and modified in 1876. Note that the 1,000 yard canal that crew cut between July and August 1854 to free HMS North Star is indicated. Credit: Library and Archives Canada R11630-3259-1-E

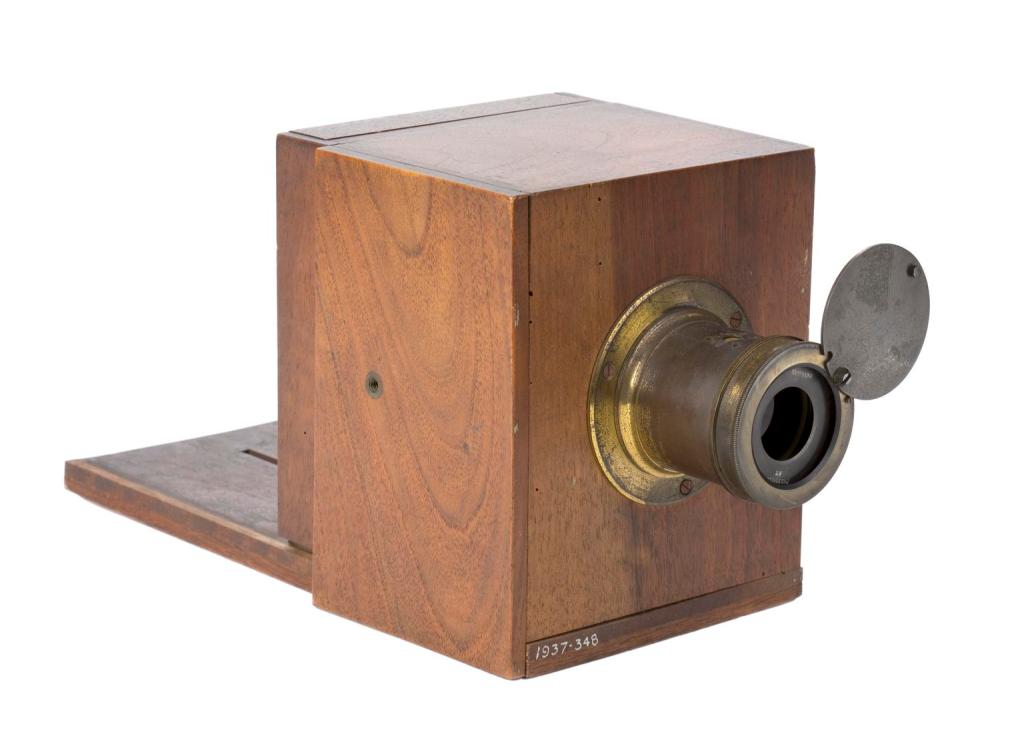
Having returned to Beechey without a ship, and not being then engaged in long-distance sledging (which he excelled at), McClintock decided to take up the role of “quasi-official” Belcher Expedition photographer. Before the Expedition departed England, HMS Resolute’s surgeon, William T. Domville, had originally been trained on taking photographic negatives using a camera obscura and developing them into prints using the calotype process. Domville took a few early photos in Greenland in 1852.5 It appears likely the camera was then stowed away for two years. Wamsley and Barr note that McClintock began taking pictures in early August 1854, and soon gained confidence with the apparatus and the complicated chemical treatment and development process.6 Despite the incredible challenges involved in producing an 1850s photographic record in the Arctic, McClintock even tried his hand at portraiture, capturing some of his companions (more on that below).

A camera obscura of French design, which resembles something similar to what McClintock would have used at Beechey. The Chevalier lens has two settings: Portrait and Landscape. Credit: Matilda Talbot. Science Museum Group © The Board of Trustees of the Science Museum, London CCBY 4.0.

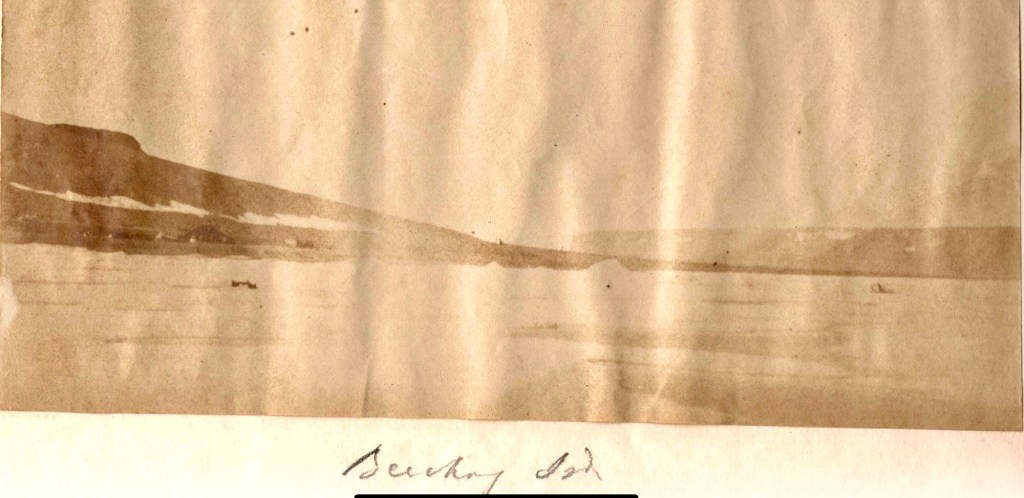
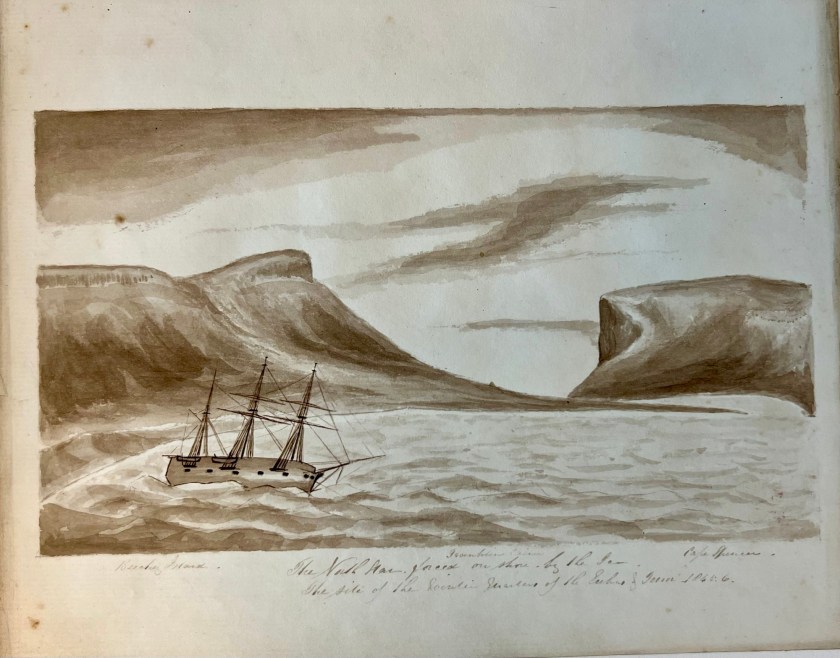
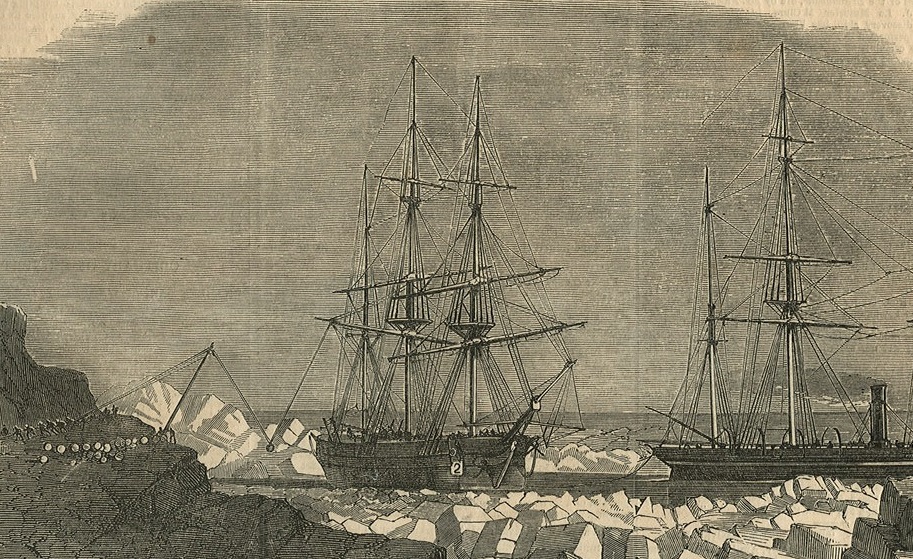
Let’s journey back to Beechey as it existed then, to accompany McClintock on his photographic excursions. In early August 1854 the explorer, now firmly in command of the northernmost example of one of Her Majesty’s cameras, struggled west across the uneven ice from HMS North Star towards the Island. He most likely led a small shore party to assist him in hefting the heavy camera and tripod. Having ascended the rocky beach, past some of the new construction the North Star crew had completed over the last two years, he tucked himself under the soaring, fortress-like cliffs, and pointed the apparatus towards the east, back across Erebus and Terror Bay (see the annotated map above).

Laid out before him was an incredible Arctic vista: The frozen bay stretched into the distance, with an almost incandescent glare rising off the ice. Above the far shore, the bulk of Devon Island (Tallurutit) extended out towards Cape Riley, whose grand headland would be just to the right of the frame. It was a view that the lost men of the Franklin Expedition would have been completely familiar with, as they had overwintered near this same spot 1845-46. The actual moment of capture was probably not attended with much drama–no flash like a cannon’s discharge, no crashing report like a musket volley fired over a crew members’ burial. Yet by removing the lens cap for a few moments, McClintock had yet again triumphed in the northern latitudes. As light passed through the lens and into the camera chamber, an image was projected and recorded onto a sheet of chemically-treated, light-sensitive writing paper placed at the back of the camera. Another wonder of the Victorian age had arrived in the Arctic! The process pioneered by William Henry Fox Talbot would have involved McClintock treating the paper with noxious chemicals before leaving North Star, perhaps having started the first washes and sensitizing steps in an improvised darkroom deep in the ship (sheltered from the 24-hour sunshine). The stages of photography and print-making can be seen in the youtube tutorial from the Victoria and Albert Museum:

Opening the lens allowed for the image of this unique scene to be transmitted onto the sensitized paper that had been loaded into the back of the camera.7 At a later moment, another treatment process in the darkroom was used to develop this now-exposed negative and fix the image in place. Through a similar (though simpler) chemical process used to prepare calotype negatives, another sheet of sensitized paper would be physically pressed beneath the negative and exposed to sunlight via contact printing. This would create a positive version of the image. These positive variants are commonly known as salted paper-prints. They display a characteristic fuzziness – from the paper-to-paper printing process- while the printed image takes on sepia-like tones.7 Here was the great advance in photography over daguerrotypes: a film developer could use the process to create MANY salted paper-prints from the single calotype negative.

Detail of photo #1, showing HMS North Star, with wash hanging to dry, and what is likely the ship’s rudder hanging from the stern davits. In the foreground is the low-pitched roof of Northumberland House, a high flagstaff and signal mast, and the newly-erected cenotaph to the lost Franklin searchers. Precise cross-referencing of details of the construction with Mumford’s journal entries indicates the image could date from 1-12 August, 1854. Courtesy of Douglas Wamsley

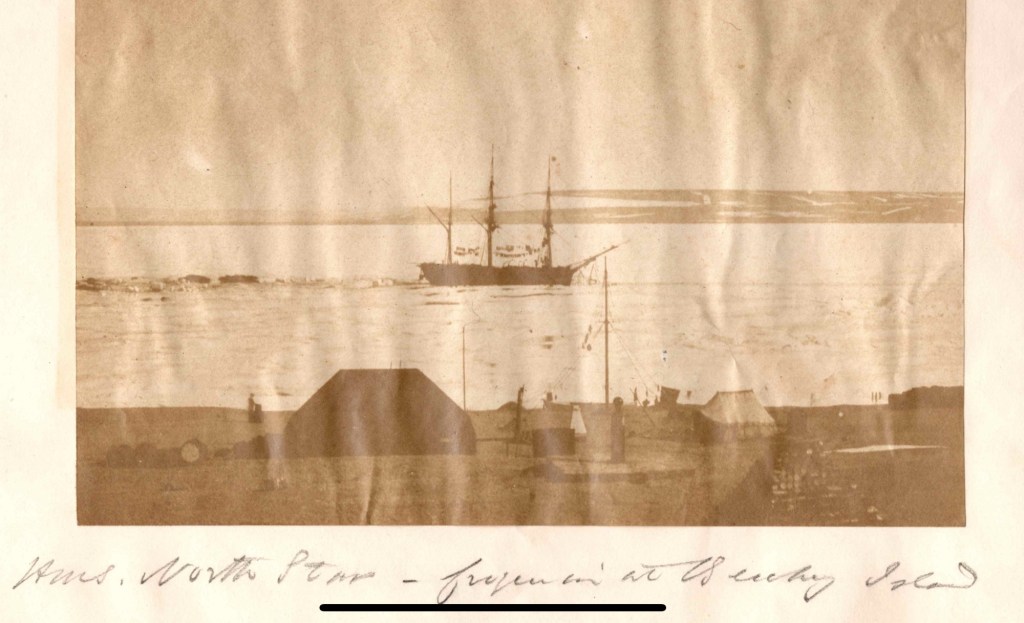
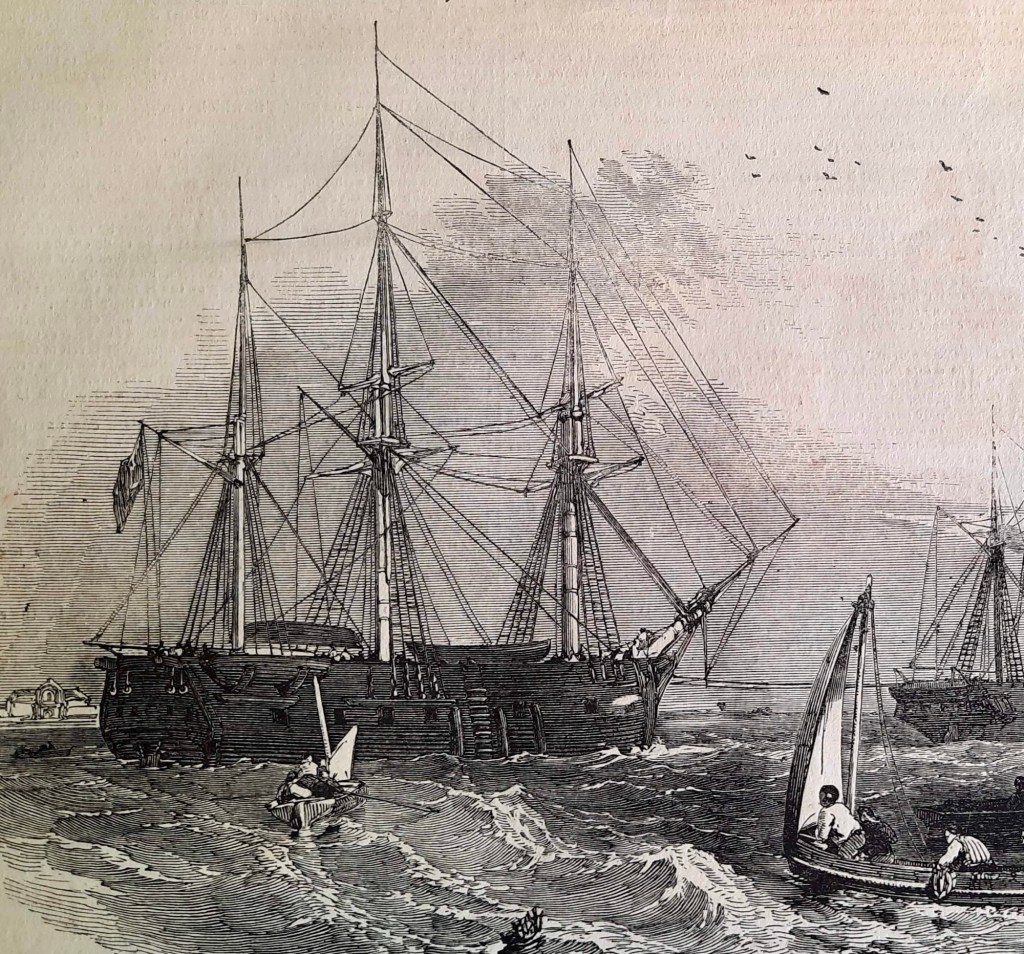
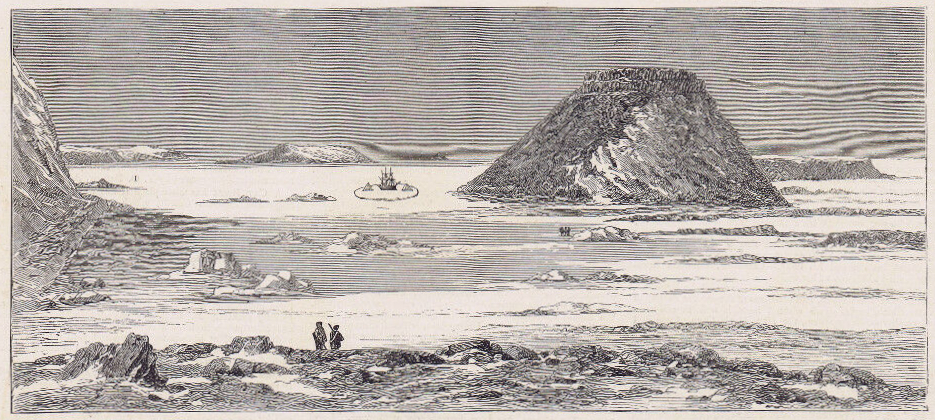
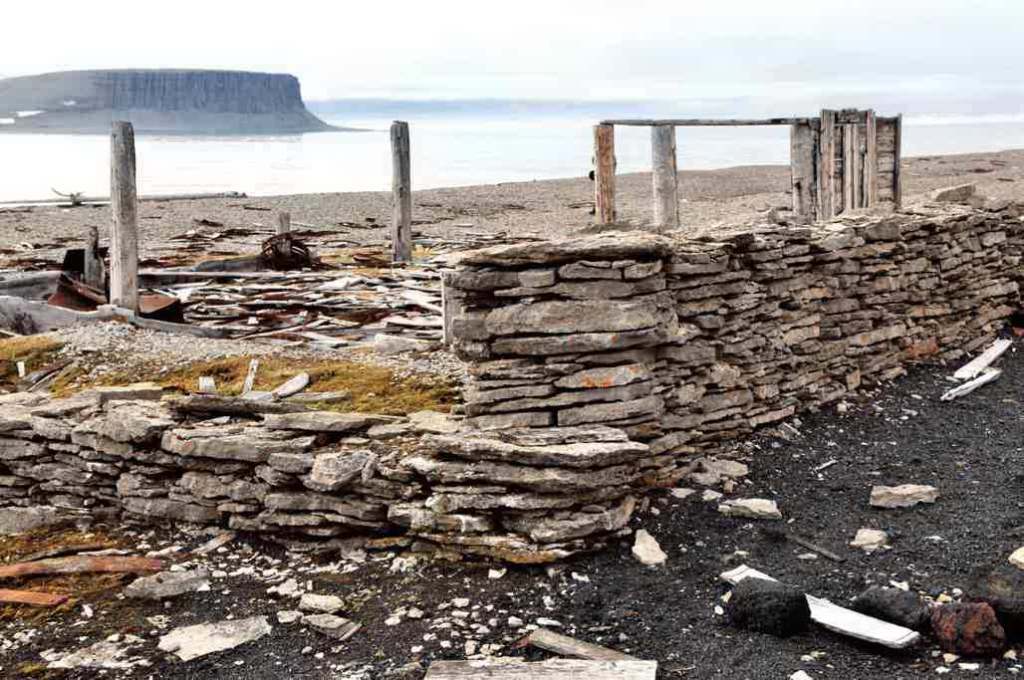
On this first print, Northumberland House appears in the left foreground as a squat roofed-over structure. This depot or Arctic storehouse had been built over the 1852-1854 summers by the crew of North Star. Captain Kellett, McClintock, and the Resolute and Intrepid crews had built a similar structure at Dealey Island.8 The house had not yet been ringed by a low wall to the north and west, which is much in evidence during Allen Young’s 1875 Pandora visit.9 To the right, a signal mast – complete with stays and a topmast – is rigged near to the shoreline, with another shorter staff standing nearer to the House.10 In the near foreground, the brand-new monument or “Franklin Cenotaph,” is conspicuous, wearing its original somber coat of black. It had been shaped by Mumford and the other carpenters from the pawl bitt of the lost whaling ship McLellan’s windlass, and raised at the very end of July. The photograph may have actually been taken on the first or second of August, when crew were paving round the monument, but had not yet finished walling in the casks on the west and north sides of the House.11 This is the only image we will likely ever see of this important cenotaph before the Joseph René Bellot memorial was affixed to the front of the pedestal at the end of that August.12

The original Joseph René Bellot memorial plaque, which would be affixed to the Franklin Cenotaph days after McClintock took his photographs. Courtesy Nunavut Archives.

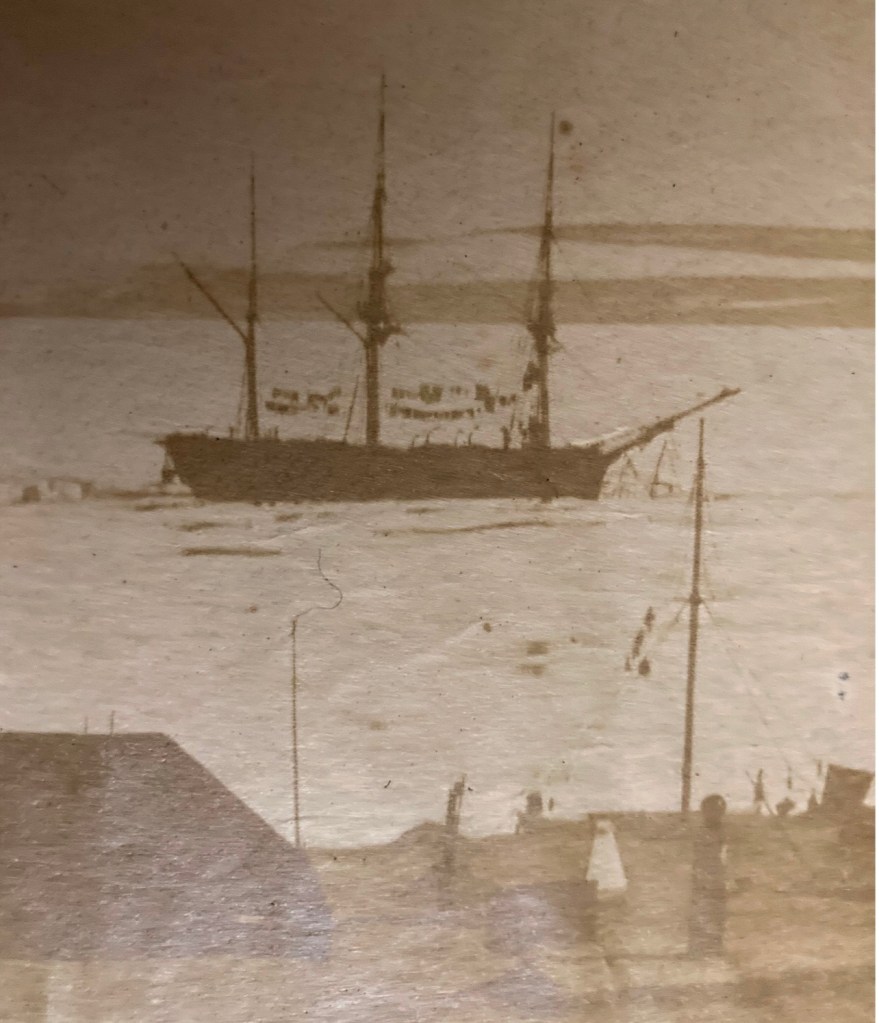
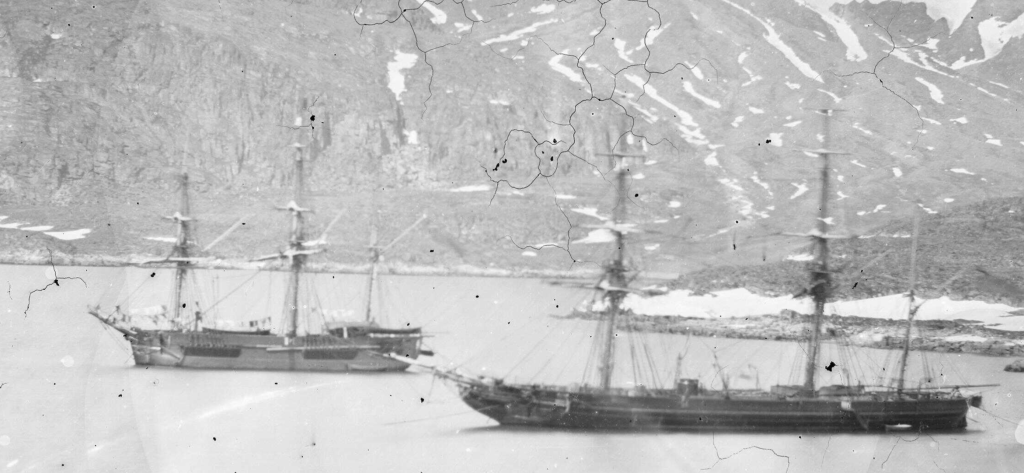
There is a pyramid of tins in the right foreground, while a tent (most likely a marquee tent raised in mid-July to prepare the site for the arrival of Captain Belcher from the still-beset HMS Assistance) had been pitched to the right. Just off the beach rests the considerable bulk of a three-masted sailing vessel in good focus. A motionless ship sailing a static sea makes for an ideal subject, given the technical limitations of 1850s photography.13 North Star was locked in ice, with masts all up but no sails bent on the yards. Though the scene has few crew members depicted, one gets the sense of industrious bustle ashore from casks lined up on the far side of Northumberland House, and what appears to be a line of boats aft of North Star. Wamsley and Barr noted that there was visible evidence at the bows that crew had commenced cutting the ice around the bows with ice saws. By the crew’s exertions cutting and parbuckling the ice, North Star had been turned with her bows now pointing south towards the open waters of the Barrow Strait.

Photo # 2: taken from an elevated position onboard HMS North Star. Northumberland House appears to left, while the low ground between Beechey and Devon Islands, and the historic Franklin Expedition graves, are at centre [cropped] Courtesy of Douglas Wamsley

The second photo used in this post was taken from onboard the North Star, in a northwesterly direction. It shows a distant and indistinct view of the shores of Beechey Island and the land bridge stretching around the bay to Devon Island. Northumberland House can be seen on the near shore. The House appears at a greater distance from the ship than in the first photo. It seems reasonable to assume this was taken days later, as North Star was gradually hauled south towards the edge of the ice. The ice appears disrupted in the foreground, suggesting the route the crew had already cut. Some black flecks at the very center of the photo may hint at the Franklin crewmembers grave boards, our next stop!

Up until a few years ago, these two prints comprised the entire extent of McClintock’s Arctic photography. That has changed over the last few years, starting with the digitization and uploading of a another salted paper print of the Franklin crewmembers’ graves located in the Gell family album at the Derbyshire Record Office (DRO). Franklin scholar Russell Potter has written an interesting contextual post about the discovery of this mysterious photograph, which we will identify here as photograph #3.14

Photo # 3: Salted paper print of the Beechey Island Franklin graves, located in the Gell family album about the Franklin searches, and likely taken by Leopold McClintock, August 1854. The graves are (L to R) William Braine, John Hartnell, John Torrington. Credit: Derbyshire Record Office (D8760/F/LIB/10/1/1) used with written permission.

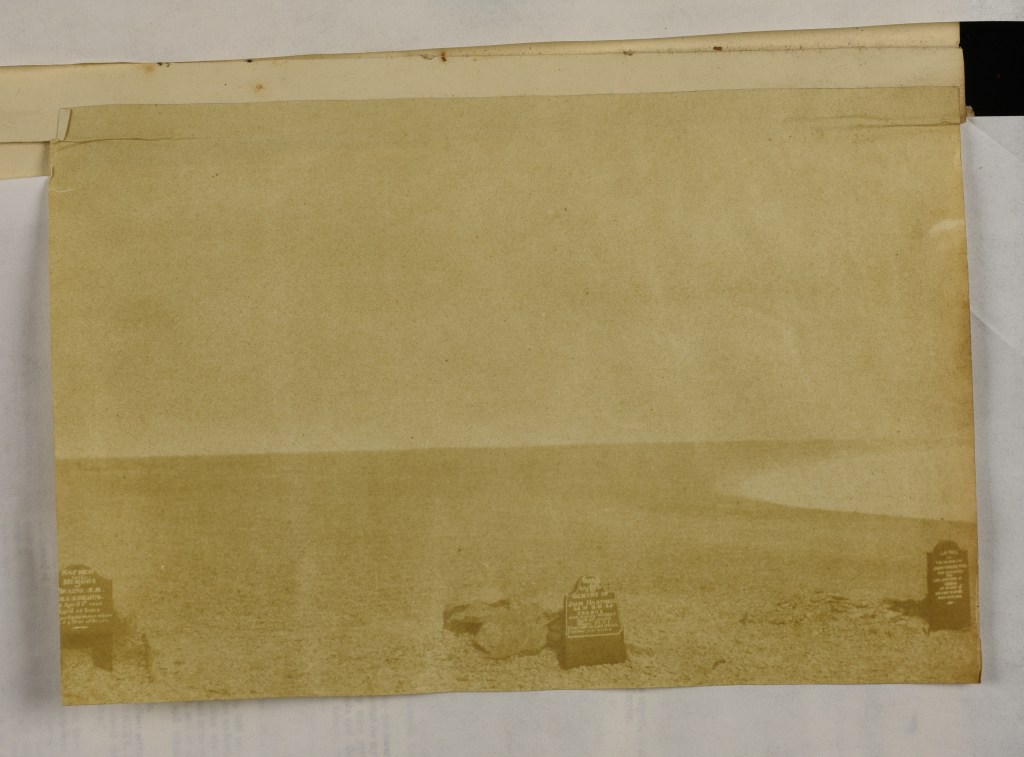
It now seems likely that McClintock did what any modern visitor to Beechey equipped with a camera would do: He walked about 1.5 kilometers up the beach and snapped the first known photo of those famous graves, which, after all, contained the only Franklin crewmembers that any searchers had (as of 1854) yet located.15 Two important details link the McClintock prints to this mysterious DRO print of the three Franklin crew members’ graves: Erebus and Terror Bay (the shoreline to the right) is a blinding expanse of frozen ice, but there is no snow on the rocky ground.16 The dimensions of the three prints are also similar, which is consistent with having been created by the same camera apparatus.17 Since Domville is believed to have stopped taking photographs after the departure from Greenland, there is also, to date, no other known photographer using a camera combined with the calotype development process that was active in the area at this time.

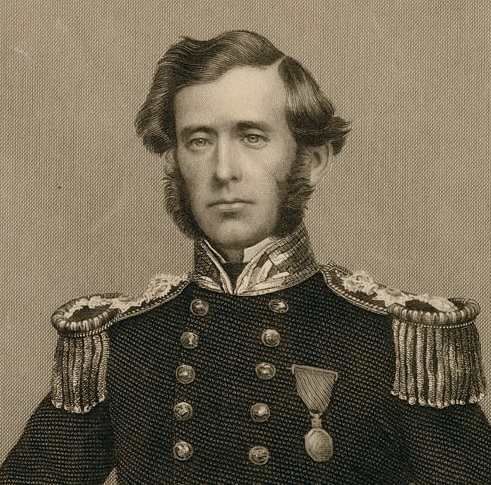
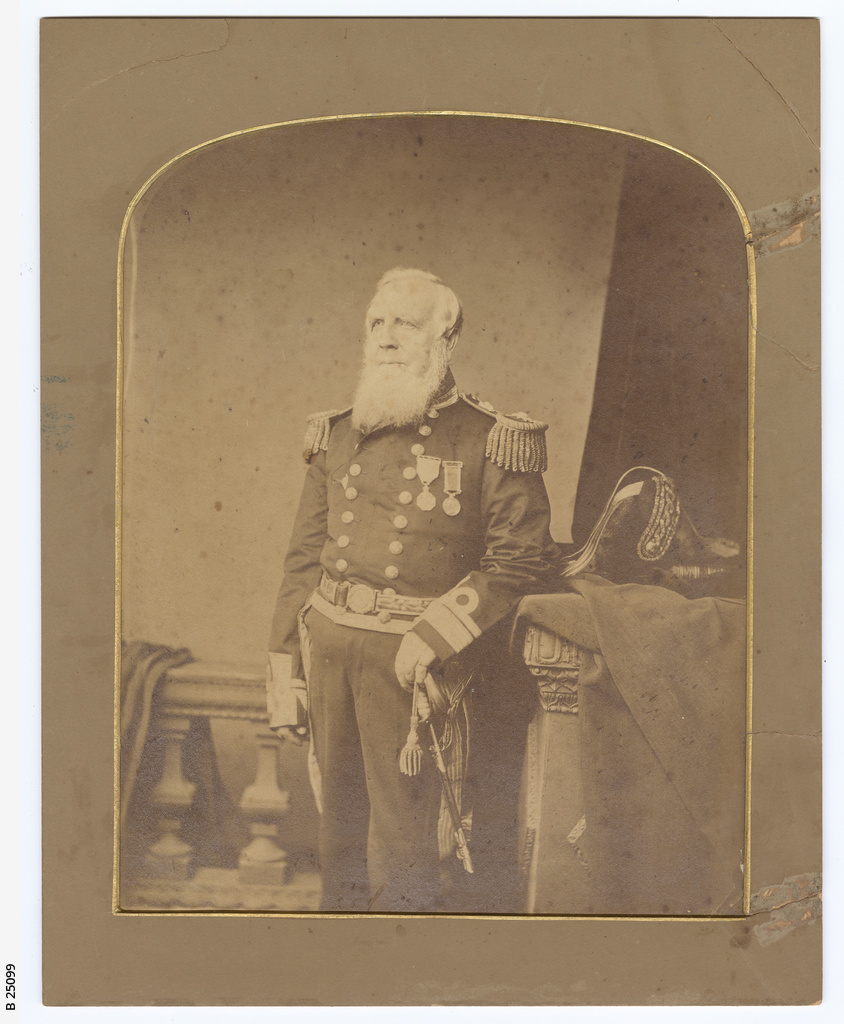
Wamsley and Barr noted (in 1996) that none of McClintock’s calotype portraits from mid-August 1854 had ever been located.18 I believe we may now also have one example of this series, which, according to the journals of both McClintock and George Ford (ship’s carpenter from HMS Investigator), were taken on 21 August 1854, on the deck of North Star.19 Recently, an item came up for sale on ebay with a strong Beechey 1854 connection: A seated portrait of an officer of the mid-nineteenth century Royal Navy (photograph #4). Notations below the print indicate it to have been taken in 1850 aboard HMS North Star, before “Father” departed on an Admiralty search for Sir John Franklin in the Arctic region. “Remembering the Franklin Expedition” Facebook group member Conner Nelson noted a strong resemblance to Cmdr. W.J.S. Pullen.20 The portrait appears consistent with an unwaxed positive, salted paper-print, from a calotype negative taken using the camera’s portrait lens setting (or possibly a separate lens formatted for portraits).

Photo # 4: Master T.C. Pullen, most likely onboard HMS North Star, wearing the undress tailcoat and epaulettes of a Royal Navy officer, via ebay.com

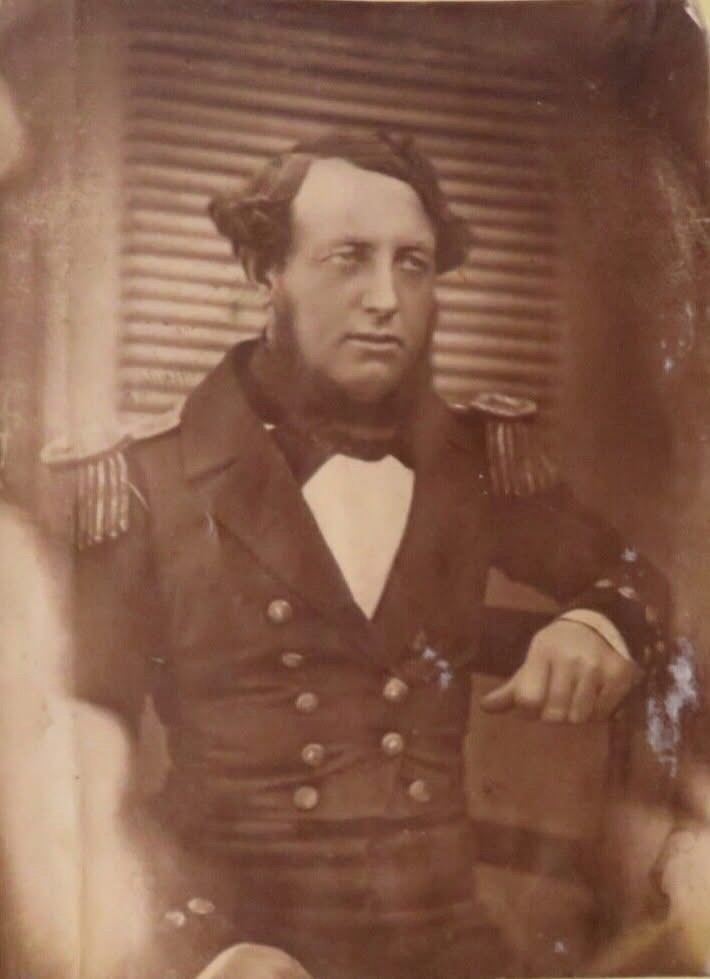
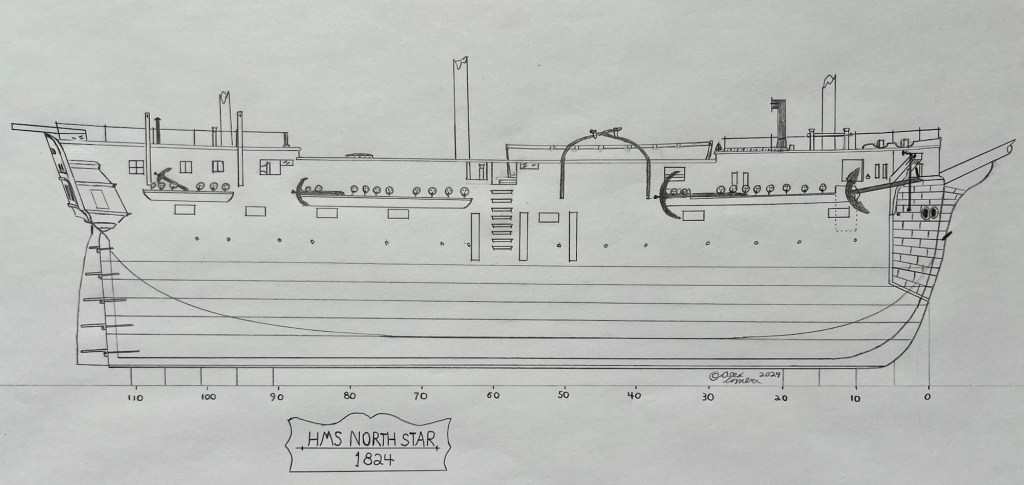
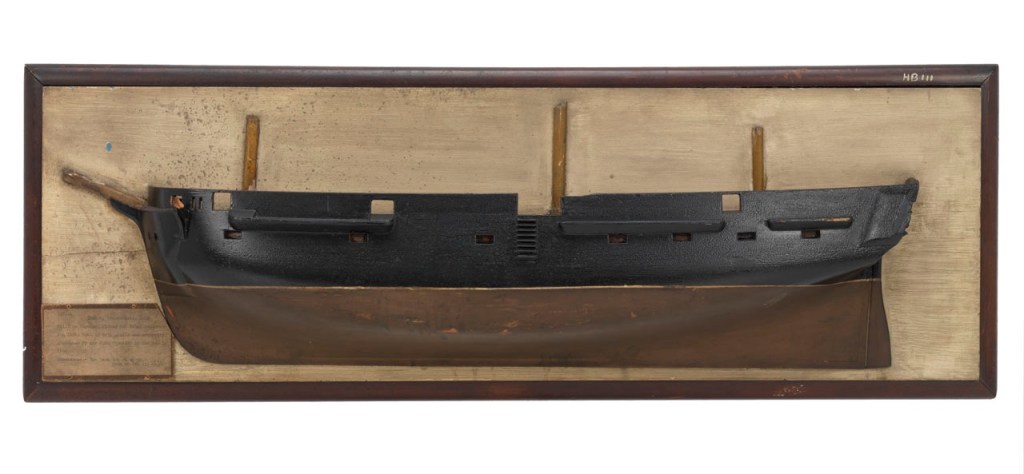
I believe this portrait was most likely taken onboard North Star by McClintock in that high Arctic summer of 1854. I also believe it depicts W.J.S. Pullen’s brother, Thomas. W.J.S. had been appointed Commander while away on his first expedition searching for Franklin in 1850, two years before he was appointed to command North Star. For this new search effort, he would be accompanied by his younger brother, Thomas C. Pullen, who served in the role of Master (a senior warrant officer). Though I have not been able to examine the portrait in person, it is unique from the contemporary image that the engraving of the Belcher Expedition commanders is based off in The Illustrated London News.21 In contrast to his older brother, T.C. appears to be the right age. He is depicted in the pre-1856 undress uniform of an officer.22 Masters in the Royal Navy had recently been granted the authority to wear the epaulettes of a junior officer, which in this era were unadorned with the distinctive anchors, crowns, or pips worn by commanders and more senior officers. Where precisely was this calotype portrait taken? My familiarity with North Star’s layout and plans leads me to suggest one likely place: Just to the side of the ship’s wheel, tucked under a “poop” deck that, uniquely of all Belcher Expedition ships, North Star was equipped with.23

Our research has established that this plan depicts the 1851 modifications to HMS North Star in advance of the Belcher Expedition. T.C. Pullen would have been sitting just on the side of the ship’s wheel tucked under the poop deck, about 1/4 of the way from the stern (left). ZAZ5516 © Crown copyright. National Maritime Museum, Greenwich, London

Though the louvered door is similar to the style of door found in an earlier illustration of North Star‘s flag locker (depicted prior to the James Saunders’ supply expedition this was located directly over the transom at the very stern), it is my belief this door led directly into “Officer’s country” – the decked-over passage and cabins at the stern that held the berthing for the Pullen brothers and the other officers.24 This would have been an ideal setting for McClintock to utilize a portrait lens (or a dual setting lens like the Chevalier lens fitted to the above Science Museum, London, artifact).25 The series of portraits captured by McClintock on 21 August may have been intended for a celebratory purpose: on that day, North Star crew finally cut through or blasted with explosive charges the final stretch of the more than 1,000 yard canal southwards and arrived at the edge of the floe. North Star had survived two punishing winters at Beechey, and could now escape the Arctic. T.C. Pullen’s 1854 journal entries record his titanic efforts – despite illness and profound weariness – to spur his crew on to free the ship from an icy grave.26

HMS North Star reconstruction 1852-54 [detail of] for information on my reconstruction of this original “Arctic Juggernaut”, and stern/bow elevations, as well as sources and other illustrations, please see our post. The TC Pullen photo would be taken just under the break of the poop. Credit: http://www.warsearcher.com

The depot ship was now burdened by supernumeraries from five abandoned Franklin search ships: Investigator, Resolute, Assistance, Intrepid, Pioneer. Just before departure, a strange sail to the east resolved itself into Edward Augustus Inglefield’s trim steamer, HMS Phoenix and the storeship Talbot. Onboard the steamer was the distinctive plaque to the memory of Bellot, to be affixed to the front of the monument, and – relevant to our photographic survey – a new generation of camera: a glass-plate camera employing the vastly superior wet collodion process. The age of the calotype photographic process had arrived and now departed from the shores of Beechey Island! Thank you for accompanying McClintock and I onboard HMS North Star, and out onto the rugged landscape of Beechey Island, these seventeen decades ago!

Acknowledgements: I would like to thank Douglas Wamsley for his support and advice and for reviewing an early version of this post, and Russell Potter for facilitating our contact last December. Library and Archives Canada Audiovisual Specialist Anitta Martignago generously shared her expertise about calotype negatives and salted paper-prints: She has actually taken and developed calotypes herself! Sylvia Wright, a direct descendant of Sir Leopold McClintock, also provided feedback. The Derbyshire Record Office staff provided additional information and kindly consented to the usage of the Beechey grave print.

ENDNOTES:

CLICK FOR ENDNOTES

Breadalbane Part 4: 171 years on – Still the Beautiful Wreck!

A hundred-and-seventy-one-years ago, crew members of the supply ship Breadalbane gazed forwards from the bow rails, looking towards the forbidding cliffs and unknown shores of Beechey Island, in the High Arctic. Today, the spot where they once stood is preserved 310 feet/ 95m underwater, near those same cliffs. Breadalbane’s shipwreck endures as a magnificent time capsule of a remarkable era of Arctic exploration.

Breadalbane’s broken bowsprit and head rails. The bowsprit was most likely sheared off as the ship plunged through the ice. Credit: used with written permission of Parks Canada, who retain copyright

This fourth post will focus on the program of archaeological research conducted ten years ago by Parks Canada and the Canadian Armed Forces at Beechey Island, Nunavut. We will also provide a brief description of the wreck, accompanied with remarkable images. The first post summarized the loss of this supply ship in the High Arctic in August 1853, while provisioning search expeditions looking for the Franklin Expedition. The second post described the original 1980s discovery and exploration of the wreck. The third post showcased the construction of an archaeologically-based scale diorama of this National Historic Site of Canada.

Two decades after the last visits to Breadalbane, there was a revived interest in exploring the wreck. The 2012 Canadian Armed Forces (CAF) work involved a preparatory survey by a naval dive team using a remotely operated vehicle (ROV). Parks Canada archaeological participation would correspond with the 2014 iteration of Operation NUNALIVUT, a CAF exercise in the Arctic.

Combined dive team photo Operation NUNALIVUT 2014 with Beechey Island’s cliffs in the background (left to right): Jonathan Moore (Parks Canada Underwater Archaeology Team), Jesse Rodocker (SeaBotix Inc.), Petty Officer Second Class Geoff White, Petty Officer First Class Yves Bernard, Leading Seaman Luke Therrien, Lieutenant Greg Oickle and Leading Seaman Quinn Audette from Fleet Diving Unit (Atlantic). Credit: Crown Copyright Department of National Defence/Canadian Armed Forces RE2014-0013-140 (cropped)

This visit involved surveying and filming efforts employing SeaBotix ROVs, one of which used multibeam sonar to guide the exploration to sites of interest, and to construct a detailed visual survey of the site. Parks Canada Underwater Archaeologist Jonathan Moore was the permit holder for the archaeological program, working from an ice camp 330’/100m above the seafloor.

One of the Seabotix ROVs in the ice hole above Breadalbane Credit: Crown Copyright Department of National Defence/Canadian Armed Forces RE2014-0013-139 [cropped]

We are very excited to share stunning ROV images from this visit. Some photos were generously provided to us by Parks Canada, and others are from the Department of National Defence. These allow us to navigate around and inside this wrecked supply barque to note some of her outstanding features.*

The ship’s port bower anchor, resting on the seabed near the copper-clad stem. Credit: used with written permission of Parks Canada, who retain copyright

The return to Breadalbane was an exciting phase in the archaeological survey of Franklin Expedition-related sites, continuing on from the 2010-2011 Parks Canada-led location and dives on HMS Investigator at Mercy Bay, Northwest Territories, and coming a short time before the discovery of Sir John Franklin’s lost flagship, HMS Erebus, in September 2014. One objective of the underwater survey was to assess changes to the Breadalbane since the 1980s.

The broken port quarter rail and rear of the unusually large deckhouse, showing fallen roof planking, the tight fit with the ship’s side rails, and the small aft deck. This area is little changed in 30 years. Credit: Crown Copyright Department of National Defence/Canadian Armed Forces RE2014-0013-133

Though Breadalbane is often treated as a footnote in the saga of Arctic exploration, and as “also wrecked” in the high-drama surrounding the lost Franklin Expedition, it is an incredible site – many areas have not witnessed significant deterioration.

Breadalbane’s well-preserved lower hull, clad in copper sheathing, and stern post (the rudder lies under the wreck on the seabed). This shows the draft marks that climb up the post. Credit: Crown Copyright Department of National Defence/Canadian Armed Forces RE2014-0013-131

The marine life growing at the wreck site is as stunning as what Dr. Joe MacInnis and his teammates encountered in the early 1980s.

Breadalbane’s capstan between the forward wall of the deckhouse and a companionway. Credit: used with written permission of Parks Canada, who retain copyright

Breadalbane helps us understand the range of options available to the British Admiralty for reinforcing mid-19th Century vessels intended for polar service. This supply vessel was not a “paper ship”, totally unprepared for the rigors of Arctic service, but rather received hybrid modifications which were suitable to her intended role: “Continuation service” outbound for the Lancaster Sound.1

This shows a sectional plan of HMS Enterprise, a barque similar to Breadalbane, which was given the full reinforcement for polar service on the Franklin searches in 1848. This plan contrasted her internal arrangements and hull prior to modification (right) with the polar modifications (left). Breadalbane did not receive most of these upgrades. The most obvious external difference is there was no heavy ice chock or channel which girdled the hull. Credit: © Crown copyright. National Maritime Museum, Greenwich, London J7311

Breadalbane was going north in the high summer. The ship was not intended to be beset by ice – frozen-in over the long, dark months. The commanding officer of HMS Phoenix, Captain Edward Augustus Inglefield, was under specific instructions to unload Breadalbane’s vital cargo at Beechey, and then get her turned around and on her way back south before the season changed and all the navigable waters froze.

Breadalbane’s interior spaces. The Lower deck looking aft from near the companionway, towards closed cabins near the stern. Note the heavy timbers to reinforce the hull. Credit: used with written permission of Parks Canada, who retain copyright

An 1853 Lloyd’s special survey report notes that the outside of the bows was shielded by 4″ thick Canadian elm planks, which extended 7′ / 2.1m below the water, from the stem back to a point even with the foremast. This was a lighter-duty version of the combined sheathing and iron-plates installed at the bows of the Franklin search ships.

Lower area of the starboard bow. This view shows the coppering of the lower hull and the beginning of the elm sheathing that extended 7′ down from the waterline and forwards to the stem. Credit: used with written permission of Parks Canada, who retain copyright

Ultimately, these reinforcements did not save the ship from being crushed. The unexpected movement of the ice south of Beechey Island on 21 August, 1853 was instantly fatal to the fabric of the lower hull. The ice created a large rent that stretches for 70’/ 21m along the starboard side, revealing the ship’s mostly empty cargo hold.

The ROV explores the massive hole in the starboard side, running along the bilge. The ice punched through the copper sheathing, ship’s side, and interior framing, before continuing on to damage supporting knees, bulwarks, and decks. Credit: Crown Copyright Department of National Defence/Canadian Armed Forces RE2014-0013-130

I would like to acknowledge the significant assistance of Parks Canada’s Underwater Archaeology Team, and especially Jonathan Moore, who generously shared Parks’ substantial research and the above images.

  1. This is how the Captain of HMS North Star, William J.S. Pullen, described Breadalbane in a letter to John Barrow, written at Beechey Island soon after the sinking. At this time North Star was frozen-in on the inland side of Beechey. As noted in the first blog, the Lloyd’s survey report of early 1853 is an important source for interpreting the modifications Breadalbane received for her “Continuation Service” (a termed used in their survey) in early 1853. ↩︎

HMS North Star CRUSHES IT in the Arctic and Saves the Searchers!

HMS North Star was an outstanding ship with a most fitting name. Like her namesake, the Pole Star, she guided mariners back home from the edges of the charted World. Though overshadowed by the lost Sir John Franklin 1845 Expedition ships Erebus and Terror, and the famous vessels searching for them, Resolute and Investigator (to name two), North Star did exceptional work in the Arctic.1 Her transformation from fighting corvette to expedition depot ship may not seem as interesting as the refits those other ships received. Actually, the 1849 rebuild created an Arctic juggernaut – a vessel tough enough to withstand collisions, groundings, ice “nipping,” and general Arctic pummeling during two missions over the course of five busy years. When all other ships had to be abandoned, North Star brought the Sir Edward Belcher Expedition home – saving the Franklin searchers!

Our interpretation of HMS North Star’s updated appearance ca. 1849-1854, ready for the Arctic! Credit:www.warsearcher.com adapted from National Maritime Museum plan ZAZ3213 and other technical info and used with written permission of NMM staff.

HMS North Star was launched at Woolwich dockyard in 1824 and completed in 1826, to a trim design – an Atholl class corvette – that we explored in a recent post.2 Like other “Donkey Frigates,” she spent much of her career in distant waters. “Donkey Frigates” was a contemporary term for a small frigate-like corvette performing the roles normally taken on by larger, more expensive to operate warships, such as Leda class frigates. A fine record of the 1826-1848 events of North Star exists at the “Index of 19th Century Naval Vessels and some of their movements” at RootsWeb. Her early service came as a member of the West African Squadron – patrolling to suppress the Atlantic slave trade. This was followed by participation in two of Britain’s imperial wars of the mid-19th Century.

A half-hull model of HMS Rainbow (1823) North Star’s sister. This model shows the clean lines of the original corvette design. SLR0706 Credit: National Maritime Museum, Greenwich, London.

A member of Sir William Parker’s fleet involved in the First Opium War (Anglo-Chinese War), she was present at the signing of the Treaty of Nanking in August, 1842. During 1845-46 North Star operated around New Zealand during the Flagstaff War, contributing shore parties that fought in battles against Maori warriors who were resisting the recently-imposed colonial regime. At the same time, at the frozen top of the North American landmass, Sir John Franklin and his two ships – making their bid for completing a Northwest Passage – were wintering at a location that would figure large in North Star’s subsequent history: Beechey Island.

HMS Cornwallis and the British Squadron saluting the peace treaty at the signing of the Treaty of Nanking 29 August 1842. HMS North Star under Captain J.E. Home was present. Rundle Burges Watson, Public domain, via Wikimedia Commons

Three years later, public concern about the condition of the missing Franklin crews was reaching fever pitch. North Star was ordered north to rendezvous with Sir James Ross’s search expedition, consisting of HMS Enterprise and Investigator. North Star, under the command of Master James Saunders, would carry provisions to help continue Captains Ross and Edward Bird’s Franklin search. Saunders was familiar with the Arctic and the lost ships: he had served on Terror for George Back’s 1836 Frozen Straits Expedition. Before the veteran warship and her forty crew members could depart, she had to be extensively modified to survive in one of the harshest maritime environments.

Master Shipwright Oliver Lang, who had been involved in the 1845 modifications to Erebus and Terror, supervised the work. More than a hundred shipwrights were tasked with the modifications at Sheerness dockyard from late February 1849. In April, that number surged to two hundred. They worked feverishly to get the ship ready for a mid-May sailing. Of all the ships that Lang was involved in refitting for Arctic service, North Star was special. What emerged from drydock wasn’t like the three other Atholls involved in the Franklin searches. It wasn’t last war’s corvette, a light survey vessel, a troopship, or some “Donkey Frigate.” Lang had created a monster! The design looked whacky, but it would prove to be the right kind of crazy for the challenges that awaited the Belcher Expedition in the Arctic.3

HMS North Star‘s updated bows, including the simplified stem and massive iron sheathing. Credit: ILN staff The Illustrated London News, 26 May 1849, Public domain, via Wikimedia Commons

The headrails and decoration at the bows were removed and a prominent ice guard of iron sheathing was installed. This projected out on a shelf-like section. Two massive hawse holes pierced this ice guard on either bow, to pay out and haul in the thick anchor cables. Reinforced catsheads supported massive port and starboard bower anchors.

A detailed view of North Star‘s bow as it appeared in 1852.”Sir Edward Belcher’s Arctic Expedition, sent in search of Sir John Franklin” Illustrated London News 17 April 1852 P305

Stretching aft along the sides of the hull, the channels were filled-in to protect the shrouds against ice damage, and massive vertical riders were installed amidships near the entryway stairs. Along the gundeck, several gunports were deleted, while the remaining ones were simplified to small scuttles-an identifying feature of this vessel. Heavy davits were hung out over either quarter over the mizzen channels to hold the boats securely. The davits over the stern had to be especially strong as this was also a location to hang the comparatively fragile rudder off of when the ships were beset in ice.

An Admiralty model long thought to be HMS Terror or Enterprise, has been identified by us as HMS North Star as modified for Arctic service. Credit: National Maritime Museum, Greenwich, (SLR0832)

The decorative stern and quarter galleries were simplified, with the lights (windows) appearing as narrow slits. Another pair of hawse holes appear to have been installed in the transom over the stern at the level of the quarterdeck, in a similar position to sister Rattlesnake’s fittings (an image of this appeared in the earlier post). These may have been intended to help position the vessel during anchoring or for shifting cargo to expedition vessels alongside. Flanking this rugged stern, the old quarter galleries were simplified. The three-masted ship rig was reduced to a barque by simplifying the yards of the mizzen mast.

HMS North Star towed out by the Stromboli departing for her first Arctic Franklin search expedition in early 1849 [detail of]. This is one of the most detailed views of North Star‘s modified appearance. Illustrated London News 26 May 1849 P340.

North Star was towed from Greenhithe by HM Steam Vessel Stromboli, departing 16 May 1849. As the season progressed, Saunders was not able to locate Ross, and instead dropped stores where they may have come in handy to either Franklin’s crews or expeditions searching for them. He departed the Canadian Arctic to re-cross Baffin Bay to Greenland. On the return journey, North Star endured treacherous ice conditions starting in July, and was nearly crushed several times. Eventually the crew sought shelter at Wolstenholme Fjord and the ship was beset in September. They overwintered further north than previous expeditions, on the coast of northwest Greenland near a table-topped mountain named Dundas Hill (Umanaq).

North Star Bay, with the ship frozen into the unusual surroundings of Dundas Hill/Uummannaq near the site of present-day Qaanaaq (fmr. Thule). Credit: Horace Harral, the Graphic 13 Nov. 1875 Public domain, via Wikimedia Commons

Four crew members perished during this time, and were buried nearby. When the ice cleared, Saunders turned west to return to the Canadian Arctic, to Baffin Bay and Wellington Channel, depositing more supplies at Navy Board Inlet. He learned that Ross had sailed for home from a chance encounter with William Penny (leading a privately-funded search expedition). North Star returned to England in the summer of 1850. Penny and Capt. Horatio Austin’s crews jointly discovered that Beechey Island had been the site of Franklin’s first overwintering – an event that would focus subsequent searches.

The Admiralty sent North Star back up again in early 1852, under the command of William J.S. Pullen. Pullen had distinguished himself in boat-led exploration missions while detached from the early western Arctic searches of HMS Plover and Herald. The new assignment was to travel with the large search squadron now being assembled by Sir Edward Belcher: HMS Assistance (Cmdr. George H. Richards) and HMS Resolute (Capt. Henry Kellett), and their steam tenders, Pioneer (Cmdr. Sherard Osborn) and Intrepid (Cmdr. Francis Leopold McClintock). North Star’s role was the unglamorous-yet-vital one of supply and provisioning.


“The first view of Greenland, Cape Desolation 21 May 1852” the Belcher squadron is all depicted, with Kellett’s and McClintock’s commands, Resolute and Intrepid, in the foreground, passing some bergy bits. Credit: Mumford Fonds, Library and Archives Canada 86-18-3

The Belcher Expedition used the same successful quartet of vessels that had gone up under the command of Austin in 1850, but added the depot ship to the mix. This, it was hoped, would help the search ships explore further and stay on mission longer than previous attempts to locate the long-lost Expedition.

A formal portrait of WJS Pullen 1813-1887, depicted later in life, in the full dress uniform of a Rear Admiral, wearing the Arctic and Crimea Medals. Courtesy of the State Library of South Australia B25099.

In early July 1852 the squadron was moving up Baffin Bay. They encountering some of the yearly whaling fleet while navigating along ice floes. North Star was damaged by the American barque McLellan. The threat of being caught between land floes and the floating pack ice was ever-present. A moment’s change in conditions could “nip” ships between these two frozen masses, without sufficient time to cut a protective “ice dock” into the land floe. Several whalers and North Star were nipped July 7th. The shuddering and wild pitching of hulls created a demonic clanging of ships’ bells. The unfortunate American whaler had also been forced against both North Star and the Alexander whaler (from Dundee). North Star‘s starboard cathead was mauled, and crew worked frantically to save the jibboom and bowsprit. As McLellan was further destroyed on the 8th, carpenters salvaged much of the hulk, and set North Star to rights.

George Frederick McDougall “The Loss of the McClellan – American Whaler” 8 July 1852 [detail of] this view shows a view of North Star, the nearer ship at left flying the red ensign, which shows some remaining transom lights and decoration, and the rudder suspended from the stern davits. Credit: Elizabeth Matthews (https://www.hms-resolute.co.uk/) used with permission.

Days later, the ship was proceeding up Lancaster Sound along the southern shores of Devon Island. Even with her rugged alterations, North Star proved the finest sailer in the squadron.4 In August, at Beechey Island, the search ships topped up coal stocks from the depot ship’s supplies. Assistance and Resolute departed separately with their steam tenders to search different areas of the Arctic archipelago. They deposited caches of supplies and left records in prominent cairns as they went. North Star’s coal supplies were vital to extending the range of the whole effort: The combination of sail and towing by steam tender proved especially successful to advancing deep into uncharted passages and extricating Assistance and Resolute from perilous conditions. North Star remained at Beechey Island from 1852-1854, overwintering twice in Erebus and Terror Bay.

“HMS North Star forced on shore by the ice at Beechey, near Cape Spencer”, This dramatic June 1853 view by HMS Resolute’s WT Mumford shows another instance where North Star was in peril. Credit: Mumford Fonds, Library and Archives Canada 1986-18-20

In September, as the Barrow Strait became a treacherous seascape of shifting ice, the Bay froze over. North Star was almost destroyed against the shore. The next June, she was again forced up. In between existential crises, Pullen kept his crew busy building up the shore establishment at Beechey with a new depot/storehouse, Northumberland House, built from components of the lost whaling ship. Crew moved Mary, a yacht left by Sir John Ross, to Beechey from nearby Cape Spencer to serve as a “rescue yourself” lifeboat, should anyone require it. In 1854 ships’ carpenters even built a cenotaph to commemorate their lost shipmates, again from timbers salvaged from McLellan.

HMS North Star, at Beechey Island. Dated May 1854, this remarkable view by HMS Resolute’s William Mumford shows Beechey’s imposing and bleak cliffs. Ashore, Northumberland House, the storehouse, and a large boat which is likely Sir John Ross’s rescue yacht Mary, are visible. [Detail of] Credit: Mumford Fonds, Library and Archives Canada 1986-18-27

The North Star and the Beechey establishment remained as the vital link in the logistical chain that sustained the Franklin search. Other vessels, under the command of Captain E.A. Inglefield, journeyed from England to resupply North Star at Beechey in the high summers of 1853-54. In early 1854, with crews weakening from the effects of scurvy and other ailments, and with no immediate prospect of escape for the ice-imprisoned search ships, Sir Edward Belcher took the difficult decision to order his captains to abandon their ships. Crews would sledge back to Beechey, along a route they knew, that they themselves had stocked with supply depots. Pullen and his forty crew assisted in bringing them in, provided medical assistance to the weakened, closed up Northumberland House in good order, and cut their own canal out of Erebus and Terror Bay to start for home at the end of August. Five crews adding up to about 230 sailors had abandoned their frozen ships and were in sledging parties marching a long trail through difficult terrain. But, unlike the 129 dead men they had been sent to find, these sailors knew they were trekking back to salvation – a beacon in the High Arctic – their familiar North Star.5

  1. This account draws from the article “Icy Imprisonment: the 1848 Voyage of the HMS North Star” at https://beyondthebackyard.com/2014/09/03/icy-imprisonment-the-1849-voyage-of-the-hms-north-star/ and from Richard J. Cyriax (1964) “The Voyage of H.M.S. North Star, 1849-50” The Mariner’s Mirror, 50:4, 302-318. (which was provided to us with thanks from Randall Osczevski). I would also like to thank Fabiënne Tetteroo for providing higher-resolution images of the first and third ILN illustrations used above, and Elizabeth Matthews of HMS Resolute, for the same help with G.F. McDougall’s “The Loss of the McClellan – American Whaler.” ↩︎
  2. Please see our earlier post on the Atholl Class sister ships that were involved in the British search efforts for the missing Sir John Franklin Expedition, for a description of the original design of the class of fourteen ships and a brief account of the Franklin search-related careers of HMS Herald, Rattlesnake, and Talbot. The group contributed a lot to the Franklin search efforts! ↩︎
  3. To see how far the original Atholl class corvette design had evolved, see for example, the 1844 plans of sistership HMS Crocodile (1825), modified for rugged service as a surveying ship, also with a fortified bow guard, and a built-up weatherdeck: National Maritime Museum ZAZ5498. This was an important source for our reconstruction. There would also have been an extensive doubling, fortification, and interior strengthening of the hull of North Star. Our plan is not considered a final plan, but is a simplified representation, and it is the only of its kind. ↩︎
  4. Observers on HMS Resolute, George McDougall and William Mumford, both commented in August 1852 entries on North Star’s turn of speed while detached to arrive at the rendezvous of Beechey to check for Assistance and Pioneer (who had become separated but were themselves were still miles away). McDougall’s 1857 published account is currently available online at babel.hathitrust.org. Mumford’s invaluable diary exists as the main part of his archival fonds at Library and Archives Canada. ↩︎
  5. HMS Investigator’s 61-man crew, frozen in at Mercy Bay, was fortuitously located by a party from HMS Resolute under Lt. Bedford Pim on 6 April 1853. Robert McClure abandoned Investigator, and moved his ailing crew over to Resolute and her steam tender Intrepid (which eventually allowed him to claim his crew had been first to transit-not sailing- the Northwest Passage). I have counted the crew in with the 180 other men of the search ships. HMS North Star’s crew was about forty strong, if she had the same numbers born as for the 1850-51 voyages, making the Expedition total to about 281 men, 13 of whom, tragically, died in the course of their service and are commemorated by name on the remote but important Beechey Island Cenotaph. The French officer Lt. Émile-Frédéric de Bray, in his published account, lists the total number of personnel at 263 (Quoted in Barr and Stein’s “Frederick J. Krabbé, last man to see HMS Investigator afloat,
    May 1854″ Journal of the Hakluyt Society 2017/01 P28). As North Star was leaving Beechey on 26 August 1854, HMS Phoenix and Talbot (North Star’s sister ship) arrived on their resupply mission, and so helped disperse the Belcher crews to transport them home to England in three vessels. ↩︎

The Atholl Corvettes: Supporting the Franklin Searches in Style

One class of Royal Navy vessel is connected to the search for the missing Sir John Franklin Expedition of 1845, and you’ve likely never heard of it! The Atholl class of corvettes were built two decades before Franklin’s Northwest Passage Expedition sailed, at the same time as HMS Erebus, Franklin’s lead ship. Four members of the class, HMS Rattlesnake, Herald, Talbot, and North Star participated in search efforts for the missing crews. In this post we explore the design of these ships and the Arctic service of three members of the class. A future post will reconstruct HMS North Star’s unique refitting and summarize her important career.

A half-hull model of Atholl class HMS Rainbow (1823) SLR0706 Credit: National Maritime Museum, Greenwich, London.

What is so special about these ships? Arctic and Antarctic exploration vessels were heavily-adapted to survive difficult conditions at the high latitudes. Exploration ships were under a different type of attack these warships had been designed for. Hulls required strengthening and fortification to serve in a chaotic environment characterized by ice floes; icebergs; bergy bits; growlers; land ice and pack ice. A ship overwintering–frozen-in to the pack–was subjected to prolonged pressures, or sharp, intense “nipping,” as the ice shifted. Exploration/discovery vessels in this period were about 100-120’ long on deck and displaced 500 tons or less. The Atholl class fits these general parameters, but its design lineage was not from the stout hulls of the bomb vessels, like HMS Terror, Hecla, Fury and Erebus. With the disappearance of these “bombs”, the Admiralty moved to searching for the lost Franklin crews with heavily converted merchant hulls: HMS Enterprise, Investigator, Assistance, Resolute.

The handsome lines of the original Atholl class design from 1817 © Crown copyright. National Maritime Museum, Greenwich, London ZAZ3213

The Atholls were a different species altogether. Their full gundecks speak to their intended role: general-purpose warships. These 28-gun corvettes were designed just after the Napoleonic Wars had concluded. They fit into a category often called “donkey frigates” – corvettes that took on some of the duties of the more expensive to operate frigates – but they would have been considered light frigates in an earlier era. The original plans for the lead ship, Atholl, were co-signed by an important design team: Surveyors of the Navy Henry Peake, Joseph Turner, and Robert Seppings. Peake had designed the Vesuvius and Hecla class bomb vessels (HMS Terror and Erebus), while Seppings was implementing wide-ranging changes to the designs of all classes of ships. In contrast to the full bilges, rounded tumblehome, and sweeping sheer of 18th Century ships, Atholls had steeply rising floors (a “V-shaped lower hull), a distinctive flat rise at the waterline, and almost flat sheer along the length of the decks. In the early years of the 19th century, these were state-of-the-art design features. Above the deck, three towering masts supported the spars, cordage, and canvas of a three-masted, fully-rigged ship.

A rare rigging plan of an Atholl class dated 1844, from the collection of the National Maritime Museum. This unnamed ship was being converted to a troop ship, and shows the simplified rig of a barque, likely to have been used on many of the converted ships. In comparison to the earlier plan, the outline of the hull shows the building up of stern and bows. ZAZ5511© Crown copyright. National Maritime Museum, Greenwich, London

For their main armament, they were fitted with a modern, versatile battery of guns. Their gundeck was fitted with twenty heavy “smashers”: 32-pound carronades. This gave the class an outsized weight of broadside.1 Compared to the older “long guns” – traditional cannon – carronades were lighter and took less crew to work, but did not have the same range to strike more distant targets. The ships also had 9-pounder bow-chaser cannon and lighter carronades on the quarterdeck. While the bomb-vessels had been built to withstand the strain of firing their two massive mortars at land targets, the Atholls were designed to withstand the firing strain of broadsides of 32 and 18-pounder carronades.

A useful contrast between a carronade (near) and a cannon. These guns are located at the Dom Fernando II e Glória (1845) Portuguese frigate at Lisbon. Credit: GualdimG, CC BY-SA 4.0 https://creativecommons.org/licenses/by-sa/4.0, via Wikimedia Commons

Fourteen ships were built in the period 1821-1828. Some of the class had been constructed in the East Indies, with design changes based on the availability of exotic timber and a shortage of iron knees.2 Three of these – Rattlesnake, Samarang, and Crocodile – appear to have had a second row of stern galleries (windows), at the level of the quarterdeck. At a time when decoration was being simplified or removed altogether, this odd arrangement for a warship made them appear similar to East India Company merchant ships.

Rattlesnake June 1849 watercolor by her captain, Owen Stanley, Public domain, Voyage of H.M.S. Rattlesnake Album: Vol. I, Old Collection of David Scott Mitchell (1836-1907), p. 84 (imag. 487084) Mitchell LibraryState Library of New South Wales (PXC 281, IE 3174589), Australia. via Wikimedia Commons

The Atholls served in some notable actions. HMS Talbot played an important role at the last great battle under sail, Navarino (1827), during the Greek War of Independence, and was also present at the 1840 Bombardment of Acre. North Star and Herald served in the First Anglo-Chinese or “Opium” War. In 1845-46, North Star was operating at New Zealand during the Flagstaff War at the same time the Franklin ships were overwintering at Beechey Island.

The Allied fleet at Navarino, 20 Oct. 1827. Reinagle, George Philip; P. & D. Colnaghi & Co Ltd; Plate 9. HMS Talbot is the ship firing at left near a burning hulk. Note the characteristic built-up look to the stern of the Atholl ships. Credit: National Maritime Museum, Greenwich, London PAF4856

During their long careers, these ships proved to be very adaptable to new roles. They could be provisioned to serve out of distant posts of the British Empire, and could be quickly converted to carry troops. Units of the class got a new lease on life when many were converted to survey or depot/supply ships. Some common modifications appear from the 1830s on. Decoration at the bows and stern was minimized, and most of the armament was removed. The spaces of the old weather-deck were enclosed to form new focs’l and quarterdeck accommodation. The officer’s cabins and wardroom were extended, and the captain’s great cabin was moved up a deck to the newly-enclosed area aft. In some cases this building-up and decking-over created what in essence is a pint-sized two-decker. Later still, the ships were converted to a variety of rolls, such as receiving ships, supply ships, storehouses, or storage hulks. HMS Talbot’s final service, as a gunpowder hulk, is visually documented because of her proximity to the site of the tragic 1878 Princess Alice sinking. The last of the class known to exist was the former HMS Nimrod, scrapped in 1908.

Recovering victims of the Princess Alice disaster. Talbot in use as a gunpowder storage hulk at right (in other views the hulk has enormous “GUNPOWDER” lettering). Unlike other views, this shows the powder hulk still having a clearly defined bow and stern. The Collision on the Thames, 14 September 1878, The Graphic, Page 4 JR Brown, Public domain, via Wikimedia Commons

Let’s briefly explore the Franklin search-related efforts of three of the class:3

HMS Rattlesnake (1822): Rattlesnake played a minor role in the Franklin search efforts. She was commissioned on 28 December 1852 by Commander Henry Trollope (with a compliment of 80) for conveying relief supplies to the (western) Arctic ships employed in the search for Sir John Franklin’s expedition: HMS Enterprise (Richard Collinson) and HMS Investigator (Robert McClure). Rattlesnake’s captain between 1845 and 1850 had been Owen Stanley, who had served on Terror during the 1836 George Back expedition, and had accompanied her and Erebus north in 1845.

“HMS Rattlesnake” by acclaimed artist Oswald Walters Brierly, who was onboard in 1848 when Rattlesnake was under the command of Owen Stanley. Credit: National Maritime Museum, Greenwich, London PAF5620

HMS Herald (1824): Captain Henry Kellett was involved in several of the western Arctic searches for the Franklin crews, from 1848 to 1850. He explored the Bering Strait (the early Admiralty assumption was that the Franklin ships may have been caught much further west along the Passage), discovered Herald Island, and in 1849 encountered HMS Investigator (Robert McClure). In the early period of searching, Kellett’s exploration complemented the searches of HMS Enterprise (James Clark Ross and later Richard Collinson) and Investigator. Herald was frequently used to resupply HMS Plover (T. E. L. Moore and then Maguire), during Plover’s six year vigil in the Pacific. In between Herald’s three forays up north, a succession of crews completed very important surveying along the Pacific coast.

This incredible 1857 photograph of HMS Herald at Sydney Harbour shows she retains her original corvette lines, full rig, and bow and stern decoration. The quarterdeck has been enclosed or decked over, as evident by the windows above the mizzen channels. She has been updated with iron davits and rails enclosing the new poop deck. The large stove pipe aft of the Foremast is evident on many plans. 79(b). H.M.S. Herald Sydney Harbour 1857, Album of views, illustrations and Macarthur family photographs, 1857-1879, PXA 4358/Vol. 1, https://collection.sl.nsw.gov.au/record/nM7lp5AY/B4xQpbaW72Xey

HMS Talbot (1824): After an active career, this veteran was converted to a storeship, to accompany Edward Augustus Inglefield’s 1854 provisioning mission to the Belcher Expedition at Beechey Island, in a similar way as Barretto Junior had helped provision the Franklin Ships in 1845.4 Unlike that ship, Talbot and Diligence (the other member of the squadron) continued on to Beechey, and were on hand to assist Inglefield’s command, HMS Phoenix, and North Star, to transport the crews of Belcher’s abandoned ships home. We are fortunate today to have a fine daguerreotype image of what Talbot looked like at this time on Inglefield’s stopover in Greenland. Talbot retains the trim appearance of a sixth-rate warship, with the characteristic updated variant of the “Nelson Chequer” of a white band picked out with black gunport lids. The transom shows some simplification, as the quarter galleries are not in evidence and the transom has been abbreviated to only five lights (windows). As with Herald above, there appears to be a building-up of the aft section to enclose new officers’ quarters.

HMS Talbot, June 1854 looking NW from Holsteinborg, Greenland. HMS Phoenix and the store ship Diligence were also depicted (cropped out from left). Phoenix’s captain, Edward Augustus Inglefield, is credited as the photographer[detail of] Credit: Captain Edward Augustus Inglefield, Public domain, via Wikimedia Commons source is National Maritime Museum, Royal Museums Greenwich G4254

Please watch for our upcoming post that will explore Atholl class HMS North Star’s incredible history and design features!

  1. In an age of fighting sailing ships, whose main armament was disposed over either Port or Starboard batteries of cannon, this is the weight of broadside or “striking power” based on the notional weight of cannon balls fired from all guns in a single broadside fired from either side. Carronades gave small ships a “smashing” broadside. Atholls broadside added up to 383 pounds: (10X32lbs+3X18lbs+1X9lbs). For comparison, a roughly equivalent ship of the previous era, HMS Surprise, of Patrick O’Brien novels’ fame, had an armament of 9-pounder cannon and a total weight of broadside of 164 lbs. ↩︎
  2. See for example National Maritime Museum midships sectional drawing ZAZ3436 of Termagant (which became Herald), Samarang, Alligator which describes some differences in these East Indies built ships. An aborted plan of the 1830s would have even cut down the design to create 20-gun ships. ↩︎
  3. For an excellent primer on the bewildering number of vessels involved in various search efforts, including the ships above, please see W. Gillies Ross’s “The Type and Number of Expeditions in the Franklin Search 1847–1859,” ARCTIC Vol. 55, No. 1 (MARCH 2002) 57–69 https://pubs.aina.ucalgary.ca/arctic/Arctic55-1-57.pdf ↩︎
  4. The previous year, Inglefield had gone up accompanied by the Breadalbane store ship, which was destroyed by ice in August 1853. ↩︎

Breadalbane Part 1: Wrecked near the Top of the World

This first post will recount the 1853 loss of the supply ship Breadalbane in the High Arctic near Beechey Island, present-day Nunavut, Canada, while resupplying search expeditions looking for the Sir John Franklin Expedition. Upcoming posts will focus on the 1980s discovery and exploration of the incredibly intact wreck, the 2012-2014 survey work by the Canadian Government, and our construction of an archaeologically-based scale diorama to help interpret Breadalbane – a National Historic Site of Canada.

One-hundred-and-seventy years ago, the Breadalbane supply ship was proceeding North to a rendezvous in Greenland. This merchant ship had been built on the Clyde River, Scotland, in 1843. Ten years later, the crew succeeded in an important mission, but Breadalbane would not return from her Arctic service. Her shipwreck was located 130 years later by Dr. Joseph B. MacInnis and his colleagues. Currently, she is the most northerly identified Canadian Arctic wreck, and one of the most northerly in the World.1 She remains one of the most intact ships from the great era of polar exploration. Breadalbane’s wreck is a vibrant oasis of marine life in a brutally harsh environment.

Of all our attempts to locate imagery and plans of Breadalbane, we have settled on this National Maritime Museum model of an 1830s merchant ship as best representing Breadalbane as she appeared before Admiralty modifications for Arctic service. Even the paint scheme appears similar to that found on the wreck. Credit: Royal Museums Greenwich SLR0726

Breadalbane was built by the firm of Hedderwick and Rankin in 1842-1843 near Glasgow, and was typical of hundreds of other merchant ships. She was roughly 125 feet from bow to stern (according to the Lloyd’s of London survey report for 1843, she was 117.8 feet, which could be a stem-to-sternpost dimension), and displaced about 430 tons, her moulded breadth was about 24 ‘, suggesting her overall width was greater. She was sturdily built, of a bewildering variety of woods, from all over the British Empire and beyond: African and American Oak, Quebec Rock Elm, Red and Yellow pine. Well-squared English and Welsh oak predominated. Unlike the later clipper ships, she was designed for economical transportation of goods, not speedy passages. Her bows were bluff, her proportions were generous (to incorporate capacious cargo holds) and her lines were simple. She was rigged as a barque–that is to say square sails on the fore and mainmast and a simpler fore-and-aft rigged mizzen mast near the stern. Compared to a fully-rigged ship, this simplified rig had only a small impact on the ship’s performance before the wind, while requiring less crew members.

The Charles W. Morgan whaling ship, a museum ship at Mystic CT, barque-rigged and the most similar surviving vessel to Breadalbane. She was built two years earlier, and is slightly smaller, with the specialized features of a whaler-tryworks stoves for melting down blubber and davits for more whale-catching boats. Credit: Ken Mist, CC BY 2.0 https://creativecommons.org/licenses/by/2.0, via Wikimedia Commons

Breadalbane’s career thus far had involved routine voyages to transport goods to and from British India. She had been meticulously maintained. Upon an 1848 return from one such voyage, she had to be set right after a minor accident in Calcutta. She was repaired with teak sections and classed again at the highest level of Lloyd’s of London assessment, A1 for ten years, with the surveyor writing ” The barque is in good condition and eligible for the safe conveyance of dry and perishable cargos to and from all parts of the World.”2

Taken up for Admiralty service in March 1853 and given a refit and modifications for Arctic service (which we will describe in a future post), Breadalbane departed from the Thames Estuary 19 May 1853, fully loaded with provisions for the search expeditions, commanded by Captain Edward Belcher, which were then scouring the Arctic for traces of the Franklin Expedition and HM Ships Erebus and Terror. It was eight years to the day since Franklin’s ships had started off on their own fateful passage. Breadalbane arrived off Disko Island, Greenland, 8 July. After meeting up with her powerful consort, HMS Phoenix, a steamship, she proceeded along the western coast of Greenland and on up the Davis Strait. Breadalbane was not updated with steam engines and screw propellers like Erebus and Terror had been in 1845. Instead, she was towed through adverse winds and dangerous ice by Phoenix.

Breadalbane under tow off Disko, Greenland. This is the only representation we have ever seen that shows both the figurehead and the deckhouse at the base of the mizzen. Detail of E.A. Inglefield’s view of HMS Phoenix towing the ship, with HMS Diligence store ship aft. Credit Library and Archives Canada mikan 2837866.

Phoenix’s Captain, Edward A. Inglefield, commanded the resupply effort. He also kept a visual record, in the form of well-executed sketches of the major events of the 1853 passage. Despite worsening ice conditions, the ships continued to make progress with Phoenix in the lead, employing her steam power and reinforced bows in the novel role of icebreaking, cutting a path for Breadalbane while simultaneously towing her.

Inglefield took a photographic record of a later resupply mission, in mid-1854, which saw HMS Phoenix (right) again leading a storeship, HMS Diligence, to resupply the Belcher expedition (1852-1854) looking for Franklin. They were photographed at Godhavn, (Qeqertarsuaq) Disko Island, Greenland. Diligence was a similar barque to Breadalbane, of earlier vintage. It appears that Diligence had been upgraded with partially reinforced ice channels under the fore, main and mizzen chains. Credit: Captain Edward Augustus Inglefield, Public domain, via Wikimedia Commons.

The ships arrived near Beechey Island off the southwest coast of Devon Island, 8 August. Beechey already had a special significance, as the spot where the Franklin crews had spent their first winter of 1845-46, onboard their frozen-in ships. It was now being used as a staging base for the Belcher expedition ships, with HMS North Star depot ship victualling the widely-dispersed search ships. For the isolated Royal Navy crews confined to Beechey for many months, Breadalbane and Phoenix’s arrival was a joyous time. News of home, new faces, and new supplies boosted spirits. Breadalbane’s goods were sustaining the largest of the Franklin searches.

Beechey is an island of lost explorers, graves, monuments, shipwrecks, and house wrecks made from shipwrecks. These are the ruins of Northumberland House, constructed in 1852-53 under the direction of HMS North Star‘s Captain, Cmdr. W.J.S. Pullen. It was provisioned with supplies in case Franklin’s crews or others returned. The mast of a whaling ship (still standing in the 1980s), whose timbers also wound up incorporated into the house, can just be seen on the beach, with a view out to Cape Riley, Devon Island, across Erebus and Terror Bay. Credit: Ansgar Walk, CC BY-SA 3.0 , via Wikimedia Commons

Navigating the ice-chocked waters off Beechey proved to be challenging, so the next day the ship manoeuvred across Erebus and Terror Bay and in close to the bluffs at Cape Riley on Devon Island. Crew members begun shifting coal ashore. Ice remained a hazard, but the transport worked back inshore to discharge more cargo on 16 August.

Breadalbane’s crew shifting supplies ashore at Cape Riley, Devon Island, in company with HMS Phoenix (at right). (Detail of) Illustrated London News 22 Oct. 1853. Credit: Frederick James Smyth, Public domain, via Wikimedia Commons

Unlike the events leading to final abandonment of Erebus and Terror, the details of Breadalbane’s loss, on 21 August 1853, are well-established. Descriptions by both Inglefield, and Breadalbane’s Second Master, William Fawckner, help chronicle the ship’s end. When most supplies had been unloaded, drifting ice began to descend on the area. The decision was taken to again evacuate the inshore area on the 20th. Sledging trips continued to remove more supplies to North Star. By midnight, Phoenix had worked her way to a position about a half-mile South of Beechey Island. Both ships were moored to a large flow. The ice crowded in, and the crew worked to save boats and to help Phoenix, which was thought to be in more imminent peril.

This remarkable work came up for auction a few years ago. It seems unlikely it was actually sketched by Inglefield, as it contrasts quite strikingly with his other depiction of the sinking. Here Breadalbane is shown heaved up on the ice, with HMS Phoenix nearby. This depiction has some unique features: A more ornate stern with three lights and false galleries (not depicted anywhere else), and lines which seem to indicate the bow sheathing.

The worst of the ice passed aft of Phoenix, smashed the boats, and brutalized Breadalbane, which would have been sitting high in the water, in ballast trim. The ice first pinched the ship, sending tremors throughout, before crashing straight through the lower hull. This opened an enormous gash along the starboard side at the same time as it ground a smaller rent in the port bows. Interior spaces, particularly around the ship’s bows, were devastated, with decks and partitions snapping like matchsticks.

The moment when Breadalbane was crushed by ice, 21 Aug. 1853, by EA Inglefield, who witnessed the events from his command, Phoenix, ahead of Breadalbane. Close visual inspection of the transom seems to indicate that there is indeed a third sealed scuttle or light across the stern, matching a detail of the auction house sketch. Evidence does suggest that Breadalbane had two enormous “2”s painted on each side, to mark her role as a supply ship. Nothing of these markings has been located on the wreck. Credit: Edward Augustus Inglefield, Library and Archives Canada [detail of] mikan 2837463

Inglefield arrived on scene and ordered Fawckner to assess the damage, as the ship settled lower by the bows. A cursory glance down the hatches into the main hold showed him that the ship was doomed. The 21-member crew worked to save a few possessions as the ice momentarily let up. Moments after all crew members had escaped over the ice, the ship plunged straight down with a rapidity that shocked all who witnessed the sorry end of Breadalbane.3 The process may have looked a bit like a sped-up version of Frank Hurley’s 1915 footage of Shackleton’s Endurance sinking in the Weddell Sea, Antarctica.

A World away, the most Southerly shipwreck, Sir Ernest Shackleton’s barquentine RRS Endurance, being gradually crushed by ice during the 1915 Imperial Trans-Antarctic Expedition. Endurance was located deep under the Weddell Sea in 2022. Credit: Frank Hurley via wikimedia commons.

The shipwrecked crew joined some of the crew of HMS Investigator (one of the search ships that had been beset and had been abandoned at Mercy Bay in April) and were soon on their way back to England on Phoenix. Breadalbane had served the Admiralty’s purpose. The ships of Britain’s far flung merchant marine were routinely lost in seas all over the World, and Breadalbane’s story seemed set to fade into obscurity, amidst the greater drama of the continued disappearance of the Franklin expedition, and the loss of many of the search ships.

A teaser for a future post. Here the model of Breadalbane’s wreck, which we will extensively interpret, is compared to satellite imagery of the Charles W. Morgan…BECAUSE WE CAN!

I would like to acknowledge the assistance and expertise of Jonathan Moore, Underwater Archaeology Team, Parks Canada, and Dr. Joe MacInnis, original team lead of the late 1970s and early 80s efforts to locate and explore Breadalbane.

  1. Jonathan Dore (Facebook group Remembering the Franklin Expedition) and David Mearns (FB group Sir E.H. Shackleton Appreciation Society) have supplied information about the remains of Benjamin Leigh Smith’s exploration ship Eira, in Franz Joseph Land, 6 degrees of latitude higher North. Eira was lost 18 years to the day after Breadalbane, 21 Aug. 1881. Breadalbane was the World’s most northerly located wreck from her discovery by Dr. Joe MacInnis in 1980 until 2018, when substantial evidence was recovered from the Eira wrecksite. Eira’s archaeological assessment is ongoing. ↩︎
  2. The Lloyd’s of London survey reports for Breadalbane from 1843,1844,1849,1853 are a valuable resource for describing her construction, repairs, and substantial modification in early 1853 for Northern service. ↩︎
  3. A detailed description of the sinking is provided by Fawckner, extensively excerpted in Joe MacInnis’s 1983 book: The Search for the Breadalbane. Many of the details of Breadalbane’s journey are taken from this source. I would like to thank Fabiënne Tetteroo for providing me with a copy of the Illustrated London News of 22 Oct. 1853 that excerpted Fawckner’s report. ↩︎